Creating new fields on an entity isn’t a difficult task, it’s usually something that won’t take more than a minute to do. But this can add up to a lot of time when you need to create 10, 20 or more custom fields all at once.
In cases like this ...read more![]()
↧
How to Create Fields with an Import in Dynamics CRM
↧
Troubleshooting CRM for Tablets Login Issues with ADFS
All CRM 2013 and CRM Online customers have access to the CRM for Tablets app that’s available for Windows 8, iOS and Android devices. Since it’s an app from the new age of mobile computing, the users can simply download it from the respective app store of the platform provider and install it. Configuring the app to connect with your CRM organization can however prove to be a bit trickier task than this.
If you’re using CRM Online hosted by Microsoft in their data centers, connecting the tablet app to the CRM server in the cloud is usually a straightforward process. Just enter the URL for your organization, then punch in the credentials and off you go. Well, to be more precise, upon your first connection the organization you’ll be taken to a screen that asks you to hold on tight while the app is being set up. This is because all of the metadata related to your CRM organization’s customizations first needs to be loaded, so that you’ll see your own CRM instead of some generic, hard coded menus and fields. This step can take quite a while to finish, but just hold on tight, it’s worth it.
If you’ve got your own on-premises CRM server or you’re logging to CRM Online via your on-premises Active Directory credentials, you may need to work a bit harder to achieve connectivity between the CRM for Tablets app and the CRM server. This is because in both of these scenarios you will have ADFS (Active Directory Federation Services) sitting there in the middle, processing your login request and validating your user credentials. Of course the same technology is also used behind the pure cloud CRM Online service, but MS has done the configuration work for you, whereas with on-premises components you’ll be in charge of performing this.

Recently I was faced with a situation where a customer had deployed Dynamics CRM 2013 SP1 on-premises and done the Internet Facing Deployment via Windows Server 2008 R2 ADFS 2.0, published via Forefront TMG (Threat Management Gateway) 2010. Accessing CRM via the web client through the IFD address was working as expected, so was the CRM Outlook client. CRM for Phones was connecting without issues and I could even connect to the server via tools like XrmToolBox with no issues. There was just one problem: the CRM for Tablets wouldn’t connect to the server, no matter what. In the process of troubleshooting this particular scenario I learned a thing or two about the tablet app connectivity as well as server configuration tasks, so I thought I’d share my findings here on my blog. I’m by no means an expert on anything surrounding ADFS , but I’m stubborn enough to keep searching for answers until I find some from the great wide web.
RTFM – Read The Friendly Manual(s)
First of all, you’ll need to know your ADFS version, since there’s a few new hoops you’ll need to jump through when working with Windows Server 2012 R2 and the latest ADFS 2.2 (sometimes referred to as ADFS 3.0, since official version numbers seem to have been dropped by MS, in favor of just shipping ADFS together with Windows Server releases). The architecture of ADFS has changed considerably from earlier 2.0 and 2.1 versions, with no more IIS in the background, so the configuration process for CRM IFD also differs from the previous experience.
You’ll find the extra steps listed on this article: Configure Windows Server 2012 R2 for CRM mobile clients. On the ADFS 2.2 server you’ll need to enable forms authentication manually, since it’s not enabled by default, like in previous versions. Then you need to run a Powershell script on the CRM server to configure the OAuth provider. Finally, you should register the CRM for Tablets app ID’s with the ADFS server via another Powershell script.
 You may run into an issue with the login process where the user is prompted for their AD credentials via the standard Windows domain dialog window repeatedly. This is because of some incorrect authentication settings that apparently are caused by the CRM IFD configuration process itself. To avoid these issues, you should run a repair installation on the CRM 2013 server with the Web Application Server role deployed, after you’ve done the IFD configuration and before you attempt to log in with the CRM for Tablets app.
Another aspect is the requirements imposed by the new Windows 8.1 version of the tablet app. Because of the changes on the OS layer, it’s no longer possible for Win8 apps to connect to any random server at will, but rather the developer has to specify the URL’s of these servers before publishing the app to the Windows Store. For CRM Online the domains for the service are known in advance, but for an on-premises deployment they could be absolutely anything. To overcome this, you’ll need to add a registry entry onto your device before attempting to connect to your server, otherwise the tablet app will just sit there and do nothing. Go to the page Set up CRM for Tablets, expand the section “what the admin needs to do” and grab the Powershell script from there. Running it on your device will prompt you for the CRM organization URL and create the necessary registry key for you.
When using TMG as the proxy server to publish your ADFS server, you’ll need to ensure that the configuration has been set up in a way that doesn’t interfere with the CRM login process. There’s an MSDN article on configuring Forefront Threat Management Gateway (TMG) 2010 as the web gateway for Microsoft Dynamics CRM Server 2011 that is the most recent documentation that I was able to discover on CRM & TMG coexistence. Since CRM 2013 Server is fairly similar to the earlier version when it comes to IFD, I assume these steps are perfectly valid. The documentation allowed me to discover an issue with the customer’s TMG web publishing rules, which had the the TMG default setting for authentication delegation that prevents direct client authentication with the server. As instructed on MSDN, this was changed to “No delegation, but client may authenticate directly”. At this point, the end results was still the same, with every other client being able to authenticate with CRM via ADFS, except for the CRM for Tablets app.

If (and when) errors occur when you attempt to connect with a CRM server behind ADFS, there’s an article on MSDN called “Troubleshooting and things to know about CRM for tablets“, which you should definitely review.
If you’re stuck with an unhelpful error message or a non-responsive tablet app and none of the known issues listed in the article, what you can try next is to enable tracing on the tablet app to collect more log data. Using a Windows 8.1 PC/tablet device provides you the log data in quite familiar surroundings via the Event Viewer. Now instead of a misleading message like “This operation failed because you’re offline” when you’re obviously not offline, you may be able to catch a lot more convincing error message, such as “CONSOLE6004 : Dynamics CRM [PAL] | Authentication: Authorization error: -2147093999″. It will at least give you a better keyword to search on GoogleDynamics Community forums.
Digging Deeper with Fiddler
In my case the searches for error codes were unfortunately not turning up a solution that would have fit the scenario where my error was occurring. So, it was time to take a look behind the scenes and examine what’s really going on between the tablet app and the CRM & ADFS servers. When you need to analyze HTTP traffic in detail, who you gonna call? Fiddler! Surely an obvious choice for many developers out there, but somewhat of a hidden gem for a large crowd IT professionals who might well benefit from the superpowers that the tool gives you (check out this article series by CRM MVP Scott Durow for a closer look).
Firing up Fiddler on my Windows 8.1 PC allows me to also track traffic from the Metro Windows Store apps by clicking on the Win8 Config button and selecting the Microsoft Dynamics CRM app from the list. Note that you could even run the Fiddler trace for the iPad version of the CRM for Tablets app, by using your PC as a proxy server (thanks for yet another great the tip, Joel!).

From this traffic log I saw that the app was first connecting to the Organization web service on the CRM server and then attempting to authenticate via the OAuth2 endpoint on the ADFS server (/adfs/oauth2/). The response to this first and last call to ADFS was “404 – file or directory not found”, which meant that there was no one home at that endpoint address. Checking out the IIS website for the ADFS 2.0 server did confirm this status: no such endpoint listed there.
I decided to compare the results with my own test server, which was also running CRM 2013 SP1 but had been IFD enabled via Windows Server 2012 R2 instead, meaning it had the very latest ADFS 2.2 version. When logging into this server from the CRM for Tablets app, I saw not just one but four requests made to the Organization web service on the CRM server. In addition, there was a call made to the main.aspx page with a client id for the tablet app being passed on. Only after these steps did the app actually attempt to authenticate via the ADFS server. Unlike in the previous case, the endpoint being used here was the /adfs/ls/ address, and instead of OAuth the tablet client logged in via WS-Federation.

What’s interesting is that the /adfs/oauth2/ endpoint does exist on my ADFS 2.2 server, but apparently this is not the route the CRM for Tablets needs to take while connecting to an on-premises CRM 2013 deployment. When testing the app with CRM Online + ADFS 2.2, I did see the the traffic quickly bounce at /common/oauth2/ on login.windows.net before coming back to the /adfs/ls/ endpoint for authentication, so there might be some sprinkles of OAuth included in the process for that deployment type.
There’s an article called “Use OAuth to Authenticate with the CRM Service” on the CRM Team blog which I reviewed next, to understand a bit more about what might be going on. The first step of the authentication process involves requesting an OAuth bearer token from the service. The response given from CRM is a “401 – not authorized” but it contains a redirect URI telling the client where they should go to authenticate.
Studying the Fiddler logs revealed that this was in fact what the first contact to the Organization web service was doing. The tablet app sent the “Authorization: Bearer” header to the server and received back a URI that was pointing to the correct ADFS server, and the familiar /adfs/ls/ endpoint. Regardless of this, the app wanted to go the the /adfs/oauth2/ endpoint for some unknown reason.

We spent a good deal of time comparing settings between this environment and other similar ones where the CRM for Tablets app was working. TMG didn’t reveal anything suspicious, nor did the CRM server. On the ADFS 2.0 server’s IIS we discovered that the problematic environment only had Anonymous Authentication enabled in the /adfs/ls/ site, whereas the other server also had Windows Authentication Enabled there.

After changing this setting on the IIS server to enable both Anonymous and Windows Authentication (note that you won’t have this on the non-IIS ADFS 2.2+ servers) and re-configuring IFD for the CRM server, we tested logging in with the tablet app once again. Surprisingly, this time it all worked and the app was able to log in to the CRM organization.

The response header from the CRM server to the app’s OAuth bearer request no longer contained a URI after the ADFS website had been enabled for Windows Authentication (which at this point had not yet been contacted by the app, mind you). This was apparently enough for the CRM for Tablets app to determine that it should try a different authorization method, leading it to successfully contact the /adfs/ls/ endpoint and log in to CRM.
So, at the end of the day we had a working on-premises / tablet combo for CRM 2013. Although the specific setting that fixed the issue was not discovered from the official documentation (nor do I have any idea why it works with the setting), at least I got the chance to review a whole bunch of useful resources related to the server configuration and troubleshooting steps when working with the CRM for Tablets app, to be better prepared for the next time when someone wants to go mobile with their on-prem Dynamics CRM environment. Plus I had a fun time looking behind the curtain with Fiddler, to understand what really goes on when the computer says “no”.
The post Troubleshooting CRM for Tablets Login Issues with ADFS appeared first on Surviving CRM.
↧
↧
Microsoft Dynamics CRM Social Listening Resources & Quick Links
Overwhelmed with all the great new product additions to the Microsoft Dynamics CRM 2013 environment? Don’t despair, here are some handy links for Social Listening.
- Sign up for a Trial
- Watch Some Videos
- Download eBooks
- Social Listening Help Center
- ‘Get Ready’ resources
- Get started – prep & steps
- Microsoft Social Listening YouTube channel
The post Microsoft Dynamics CRM Social Listening Resources & Quick Links appeared first on Innovating on CRM.
↧
Tip # 210: See when CRM for Tablets last synced metadata
If you have a user who does not see the latest customization changes in the CRM tablet app, check the last time that the user’s tablet app synced customization changes.
Click the options (…) button in the lower right corner, click “Settings,” then “About.”
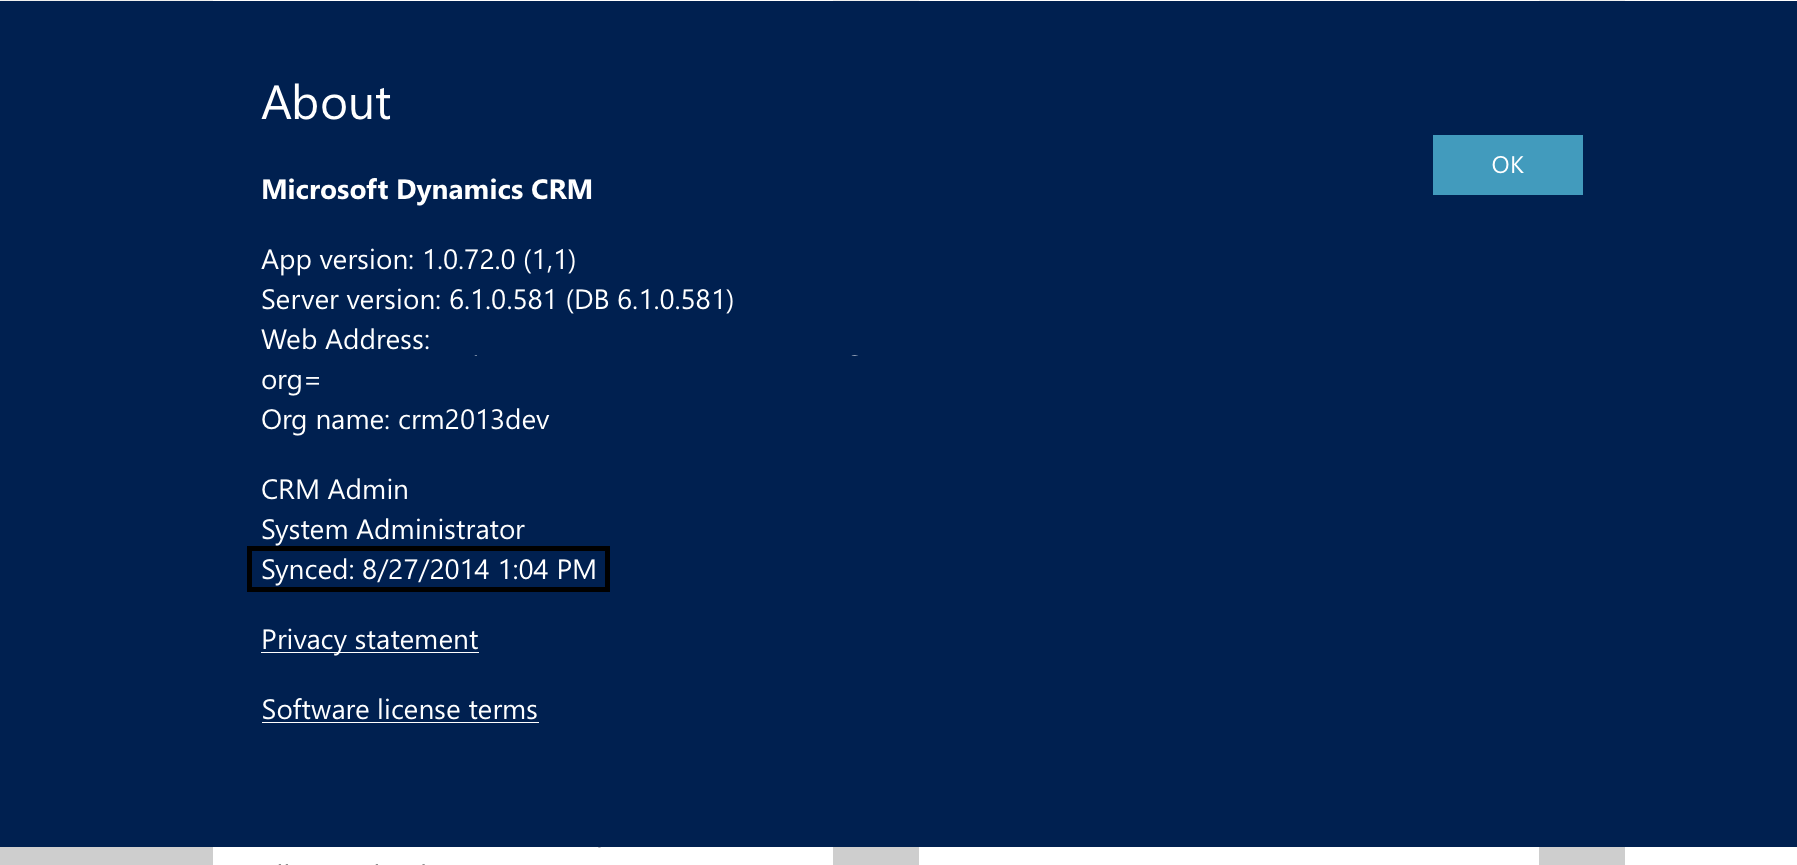
The “About” screen gives some useful information, such as the app version and the server CRM build number. It also tells us when the last time the user synced. If the sync date is prior to the last time you published customizations, hard close the app and restart it, downloading customization when prompted.
If the user is not prompted, publish customizations in CRM, then have the user close the app and restart it.
↧
CRMUG PS: A "Day in the Life" of a Distribution Sales Professional by Beringer Associates (Oct 2014)
10/01/2014 11:00 AM (ET)
CRM for Distribution is fully integrated with your ERP Platform and is enabling distributors to improve sales effectiveness and achieve results. Harness the power of your ERP system to more effectively target, market, sell and service your prospects and customers. Join us to see how Beringer Associates solutions improve a “Day in the Life” of a Distribution Sales Professional!
Open Webinar; All Members Welcome
↧
↧
Step by Step creating wildcard certificate
Most of the time while setting IFD for Microsoft Dynamics CRM 2011/2013 dev environment we use wildcard certificate. In this post we are going to provide step by step instruction to setup a wildcard certificate using IIS 7. We are using windows 2008 r2 operating system.
In order to create a wildcard certificate first we need to generate a certificate singing request using below steps
Step 1. Make sure certificate authority service up and running in your server (If certificate authority is not installed, you can refer this to install it)
Step 2. Navigate to IIS manager and select your root server.
Step 3. Double click on Server Certificate under featured view.

Step 4. Select “Create Certificate Request” under Actions from right hand section.
Step 5. Fill required information

Note: make sure to use an asterisk (*) because we are creating wildcard certificate.
Step 6. Click on Next and select below options
Cryptographic Service Provider: Microsoft RSA SChannel Cryptographic Provider
Bit Length: 2048
Step 7. Click next and specify file name for your certificate request for example (Let’s say wildcardcert)
Step 8. Click on Finish
Now we have created a certificate signing request, we can submit it against windows certificate authority using below steps.
Step 8. Run command prompt and use below command (you can right click on command prompt and run it as Administrator)
certreq-submit -attrib “CertificateTemplate: WebServer” c:\wildcardcert.txt
first it will prompt to select certificate authority and then it will prompt to save your certificate, give it a name and save it. Exist from command prompt.
Now we will be completing our certificate request using complete certification request.
Step 9. Goto IIS->Root server->Server Certification->Actions and select Complete Request option under Action.
Step 10. Click on browse and select your certificate file that is created in last step.
Step 11. Provide friendly name and click ok.
Now our wildcard certificate is ready and can be used in binding MS CRM website.
HIMBAP | Need any help in MS CRM 2013 Contact US !!


↧
Microsoft Dynamics Marketing Resources & Quick Links
Microsoft Dynamics Marketing is a great new addition to the Dynamics CRM Marketing platform. You can learn more about it and even sign up for a trial using one of the following resource links:
- Trial Microsoft Dynamics Marketing
- Videos
- eBook; Increase your impact with Microsoft Dynamics Marketing
- Marketing Help Center
- ‘Get Ready’ resources
- Get started – preps & steps
- Microsoft Dynamics Marketing YouTube Channel
The post Microsoft Dynamics Marketing Resources & Quick Links appeared first on Innovating on CRM.
↧
Location, Location, Location: Bing Maps, Parature Come Together on Spatially-enabled Customer Care
NOTE: The following is a guest post by Parature, from Microsoft Technical Specialist, Geoff Innis. Geoff came to Microsoft with the acquisition of Multimap in 2007, and enjoys helping organizations optimize customer engagement and make smarter business decisions with cloud solutions. He is based in Bellevue, WA. When interacting with a customer, knowing where they are located can enable a customer service representative to provide them with personalized, real-time, location-specific insight and information. Further, by visualizing larger groupings of customers, interactions, or social media events on a map, customer service and related teams can identify trends by location, and use these location-based trends to optimize customer care strategies and behaviors, as well as proactively address and provide information.
The Bing Maps Blog recently published a developer-oriented post that shows how organizations can spatially enable their approach to customer care by integrating Bing Maps for Enterprise, Microsoft’s enterprise-grade web-based mapping platform, into Parature.
The blog post provides step-by-step guidance on how to:
- Capture information about the customer’s location as they submit trouble tickets through a Parature Customer Portal
- Display map views of individual ticket locations in the Parature Service Desk, to empower CSRs with location context they can use to quickly and accurately resolve customer issues
- Visualize ‘Heat Maps’ of customer issues within the Service Desk, to enable CSRs and supervisors to identify geographic trends in customer issues, and use this location intelligence to make smarter business decisions.
![]()

By incorporating a map view of a customer location or ticket locations directly into the customer service representative’s ticket view, ticket resolution time can be reduced by avoiding agent context switching when:
- Handling issues related to finding nearby locations or service points in proximity to the customer
- Providing information on products or services offered in the customer’s region or specific location
- Pinpointing precisely where customer-reported incidents or other problem-reports are located at first-contact.
Scenarios in which heat map visualizations of tickets can be of benefit include:
- Understanding where, geographically, we may have infrastructural issues that need addressing, based on the concentration of service issue reports
- Understanding which jurisdictions we may need to adapt our constituent outreach programs in
- Understanding which geographies or demographic groups a brand's Parature Knowledgebase content may not be serving effectively, and adapting it.
With the continued increase of customer and constituent engagement through mobile channels and the proliferation of connected devices, along with growing expectations from the customer for real-time, proactive and personalized service, the opportunities to optimize and streamline customer care using location intelligence will only grow over time. This is a great example of where customer service is heading.
You can find the full developer-centric post on the Bing Maps Blog here.
To request additional information on Parature Customer Service Software, click here.
↧
Create a List of Values for Workflow Check Conditions in Dynamics CRM 2013
When creating a workflow check condition in Microsoft Dynamics CRM 2013, you may have come across the need to list the values of a specific field that satisfy the check condition criteria. The most straightforward way to do this is to use the EQUALS operator and list each value that satisfies the check condition on its own line and then group them by OR.

However, this can become cumbersome to create if the list of values is particularly long. Fortunately, if the field in question is of either the Lookup or Option Set type, you can select all of the specific values that satisfy the check condition criteria on a single line, which is a much quicker process.
First, choose the EQUALS operator and select the search icon on the value entry field.

Next, select the records you would like to include in the check condition line item.

Lastly, click the Select button and then click OK to complete the process.

This will result in a list of values entered on one line.

The Option Set mechanism for accomplishing this same task functions slightly differently.

However, the outcome is identical.

Occasionally, the field in question will be a free form text field. In this case, the same options available for Lookup and Option Set field types do not present themselves. You could return to creating a line for each value you would like to include and use the CONTAINS or EQUALS operators in a similar fashion to method described in the beginning. Once again, this is cumbersome for a large list of values. In particular, while you may have the list of values neatly listed in a text file ready to be copied and pasted all at once, you nonetheless must manually configure each line in the check condition and enter a unique value per line.
This is where the IN operator comes to the rescue. For text fields, the IN operator allows you to compile your list of values to be used as check condition criteria in a semicolon delimited format (no spaces after the semicolons), which can be entered on one line of the check condition just as with Lookups and Option Sets.
Below, a text field is the check condition target. The operator selected is the IN operator. A semicolon delimited list with no spaces after the semicolons has been entered to complete the check condition line item.

While it is definitely best practice to structure the data entered in Microsoft Dynamics CRM 2013 via data types such as Option Sets and Booleans, you may still encounter the need to create workflows that have text fields in their check conditions. The IN operator allows you to bring the same design functionality to bear on text fields that is present with Option Sets and Lookups. If you enjoyed this blog, make sure to check out the rest of our Dynamics CRM blogs or sign up for one of our Dynamics CRM events or webinars!
Happy CRM’ing!
The post Create a List of Values for Workflow Check Conditions in Dynamics CRM 2013 appeared first on PowerObjects.
↧
↧
Microsoft Dynamics CRM Best Practices for Contacts Who Change Companies
People frequently change companies, bouncing from one employer to another within the same or similar industries. If you work within a particularly close-knit industry, you will undoubtedly have Contacts who change from one company with which you do business to another with which you do business. We at xRM (www.xrm.com) answer that question frequently in our Introduction to Microsoft Dynamics CRM webinar.
As a Microsoft Dynamics CRM administrator, you will have to decide how your organization will handle this scenario. In Microsoft Dynamics CRM, you essentially have two options:
- Reassign the Contact to another Account.
- Deactivate the Contact record and recreate it under the new Account.
Both options work, but you will have to decide which is better for your organization.
Reassign the Contact to another Account
Your first option is to reassign the Contact to another Account. This process is very easy and only requires that you change the Company Name field on the Contact record.
As you probably know, Contacts in Microsoft Dynamics CRM are typically related to Accounts in the database, although they can also exist on their own. Relating Contacts to Accounts allows all of the Activities, such as Emails, Tasks, Phone Calls, and Appointments, to roll up to the Account level.
If you reassign the Contact to another Account, all of the Activities that are related to that Contact will now roll up to the new Account. Watch what happens when Benedict Arnold moves from Uncle Sam Enterprises to His Majesty’s Royal Army.
By reassigning Benedict Arnold from Uncle Sam all Activities related to Mr. Arnold now roll up to the His Majesty’s Royal Army Account record.
Deactivate and Recreate Contact
The second option is to deactivate the existing Contact record and recreate it under the new Account. Watch what happens when we deactivate the existing Contact record for Benedict Arnold. Notice that we aren’t deleting it. We are simply deactivating it.
All of the Activities remain related to the Uncle Same Enterprises Account record and we can always Activate Benedict Arnold’s existing Contact record later if we need to.
When we recreate the Contact Record for Benedict Arnold under the His Majesty’s Royal Army Account record, none of Benedict Arnold’s previous Activities will follow him. He’ll have a clean slate.
Which option is best?
The best practices approach for dealing with Contacts who move from one company to another will depend on your particular business and industry. If your Contacts are the most important entities with whom you do business, and you frequently continue to do business with them as they move from firm to firm, you will want to reassign them. This will allow you to maintain the history of communication with that person on one record. For example, if you are a recruiting firm, people are your most valuable asset and you will want to maintain your communication history with your Contacts as they move from company to company. Similarly, if you deal with consultants who move firms, you will likely want to maintain your communication history with that person.
If however, if your Accounts are the most important entities with whom you do business, you should Deactivate the Contact Record and recreate it under the Account that represents the new company at which they work. This option will likely suit most companies better than moving the Contact because it will allow you to maintain the history of communication, as well as the Case history, that you have with that company.
↧
Cannot Uninstall Solution error with Microsoft Dynamics CRM Online
Cannot Uninstall Solution error with Microsoft Dynamics CRM Online
Some of our clients have recently contacted us with the following issue. When we try and remove a managed solution (typically relating to the social “Insights for Microsoft Dynamics CRM Online” solution) we get the following error:
 This solution cannot be uninstalled because the ‘LocalizedLabel’ with id ‘xxxxxxxxxxxxxxxx(Form)’ is required by the ‘ServiceEnhancements610′ solution. Uninstall the ServiceEnhancements610 solution and try again.
This is a common error and you are certainly not the only ones to experience this issue. After the recent CRM Rollup 1 upgrade, users have experienced some challenges removing solutions. This is currently being investigated by Microsoft and they plan on resolving this issue with RU1 SP1 (Build 6.1.0.1214) to be released within the next couple of weeks (Mid September 2014).
If you are experiencing this issue please be patient, there is nothing you, Microsoft or your implementation partner can do at this stage.
————————-Full Error Log——————————
Unhandled Exception: System.ServiceModel.FaultException`1[[Microsoft.Xrm.Sdk.OrganizationServiceFault, Microsoft.Xrm.Sdk, Version=6.0.0.0, Culture=neutral, PublicKeyToken=xxxxxxxxxx]]: This solution cannot be uninstalled because the ‘LocalizedLabel’ with id ‘xxxxxxxxxxxxxxxxxxxxxxxxxxxxxxxxxxxxxxxx(Form)’ is required by the ‘ServiceEnhancements610′ solution. Uninstall the ServiceEnhancements610 solution and try again.Detail:
<OrganizationServiceFault xmlns:i=”http://www.w3.org/2001/XMLSchema-instance” xmlns=”http://schemas.microsoft.com/xrm/2011/Contracts”>
<ErrorCode>-2147160032</ErrorCode>
<ErrorDetails xmlns:d2p1=”http://schemas.datacontract.org/2004/07/System.Collections.Generic”>
<KeyValuePairOfstringanyType>
<d2p1:key>0</d2p1:key>
<d2p1:value xmlns:d4p1=”http://www.w3.org/2001/XMLSchema” i:type=”d4p1:string”>LocalizedLabel</d2p1:value>
</KeyValuePairOfstringanyType>
<KeyValuePairOfstringanyType>
<d2p1:key>1</d2p1:key>
<d2p1:value xmlns:d4p1=”http://www.w3.org/2001/XMLSchema” i:type=”d4p1:string”>xxxxxxxxxxxxxxxxx(Form)</d2p1:value>
</KeyValuePairOfstringanyType>
<KeyValuePairOfstringanyType>
<d2p1:key>2</d2p1:key>
<d2p1:value xmlns:d4p1=”http://www.w3.org/2001/XMLSchema” i:type=”d4p1:string”>ServiceEnhancements610</d2p1:value>
</KeyValuePairOfstringanyType>
</ErrorDetails>
<Message>This solution cannot be uninstalled because the ‘LocalizedLabel’ with id ‘xxxxxxxxxxxxxxxxx(Form)’ is required by the ‘ServiceEnhancements610′ solution. Uninstall the ServiceEnhancements610 solution and try again.</Message>
<Timestamp>xxxxxxxxxxx</Timestamp>
<InnerFault i:nil=”true” />
<TraceText i:nil=”true” />
</OrganizationServiceFault>


↧
What Are Some of the Default Entities? #msdyncrm
When you purchase Microsoft Dynamics CRM a number of entities come with the system (if you need a refresher in entities, see previous post). You can create hundreds more, but here are some of the building block Entites.
- Lead
- Account
- Contact
- Address
- Opportunity
- Case
- Case Resolution
- Activities including
- Social Activities
- Tasks
- Appointments
- E-Mails
- Phone Calls
- Faxes
- Letters
- Product
- Article
- Competitor
- Connection and Connection Role
- Contract
- Document Location
- Entitlement
- Goal
- Invoice
- Order
- Price List
- Queue
- Campaign
- Team
- User
- and so much more!
↧
PowerUp—The CRM Event! A Closer Look at the Pre-Conference Training Day
PowerUp—The CRM Event, is less than a month away! The conference has two full-days of Dynamics CRM educational content tailored to everyone from beginning users to advanced administrators. If you’re looking for more hands-on training, you can also attend the PowerUp Pre-Conference Training day on Tuesday, September 23. This will be a full-day of training where attendees choose to take one of these three training courses:
Intro to Extending CRM
For those with existing programming experience, this course is designed to introduce you to the software developer’s toolkit (SDK) and the caveats of extending Microsoft Dynamics CRM. Covering JavaScript, plugins, custom pages, and portals at a high-level, this training will not be hands-on, but will provide time for questions and discussions on how to get started and where to find resources.
Marketing in a Whole New World
A new era of customer behavior means marketers are plotting a new course for their strategies, tactics, tools, staff, and partners. Get a framework for navigating this new world while using the functionality and data in CRM as your compass. Join us for this course to experience firsthand marketers’ best practices in building buyer personas, mapping the customer journey, building predictive lead scoring, tapping into emerging digital and mobile methodologies, and much more. You’ll also get an unprecedented view of updated marketing tools in the Microsoft Dynamics product line. For modern marketing leaders and technologists using Dynamics CRM, this is your can’t miss event of the season.
The *New* Customer Service in CRM
In 2014, Microsoft has released significant enhancements to the Service area of Microsoft Dynamics CRM. In this course, we will do a deep dive into the new features for customer service including:
- Case Form updates, Hierarchies, Parent-child, Merging, and Auto-case creation
- Entitlements & SLA’s
- Queue Enhancements
- Routing Rules
We will also demonstrate and discuss other new features of CRM 2013 including:
- Mobility Updates
- Server Side Sync Improvements
- New SharePoint integration options
- Unified Service Desk which provides a framework to configure Call Center applications
The Pre-Conference Training day will take place at PowerObjects headquarters in Minneapolis on September 23 from 8:30 am to 4:30 pm with breaks and lunch included. Space is limited so be sure to register now!
We hope to see you in Minneapolis for this great event!
Happy CRM’ing!
The post PowerUp—The CRM Event! A Closer Look at the Pre-Conference Training Day appeared first on PowerObjects.
↧
↧
Business Collaboration Tools From Microsfot Dynamics
Business collaboration tools are an increasingly important part of any IT portfolio. With cloud and mobility enabling new ways of communicating and collaborating, your ability to maintain your competitive advantage hinges on keeping your people connected. See how Microsoft Dynamics helps keep your people connected.
Dynamic Business Collaboration Tools Video
Connect you field employees with customer data, inventory, co-workers and managers while opening up improved dialogue between departments so you can close faster and improve your customer experience. Microsoft Dynamics business collaboration tools in the cloud give you the data you need, when you need it.
About goERPcloud
goERPcloud is the first on-demand Microsoft Dynamics Cloud Marketplace that allows you to test drive different flavors of Microsoft Dynamics AX, GP, NAV and CRM with preconfigured 3rd party applications. goERPcloud boasts a robust ecosystem of Microsoft Dynamics Partners, helping businesses find the cloud-based software solutions that best fit their current and future business needs. Since 2000 RoseASP.com, the power behind goERPcloud, has provided hosted Microsoft Dynamics ERP and CRM applications to businesses around the world. For more information about goERPcloud, visit www.goERPcloud.com.
The post Business Collaboration Tools From Microsfot Dynamics appeared first on goERPcloud.
↧
Spring ’14 Release Videos for Microsoft Dynamics CRM, Microsoft Dynamics Marketing and Microsoft Social Listening
Applies to: Microsoft Dynamics CRM, Microsoft Dynamics Marketing and Microsoft Social Listening
We've created some very informative videos for our Spring ’14 release. If you have not seen them already, check them out!
Do let us know if they are helpful!
Shilpa Sinha
Program Manager
Microsoft Dynamics CRM
↧
Microsoft Dynamics CRM 2013 Server-Side Exchange Synchronisation
 As part of my role at TSG I often get asked about email set up with Dynamics CRM. With Dynamics CRM 4 and 2011 email messages were sent and received either via the email router or via Outlook, this was great as you could track email messages against a case, contact, account etc. in CRM. In Dynamics CRM 2013 the Email Router and Outlook are still available, however as with the previous version of CRM you have to have Outlook open in order to synchronise contacts, appointments and tasks, something which doesn’t really lend itself to mobile working with the cloud.
One of the new features that came in with Dynamics CRM 2013 was the long awaited Server-Side Exchange Synchronisation.
Here we can see that now Server-Side Exchange Synchronisation runs as part of the CRM Asynchronous Service and connects to the exchange web services. This means we no longer need a dedicated service, and if we’re using CRM Online with Exchange on Office 365, we can have them integrate in the cloud, and access our Contacts, Appointments, Tasks, and tracked Emails via our PC, Windows Phone, and Surface Pro 3 all using Outlook!
Features of the Server-Side Exchange Synchronisation include the following:
Feature | Description |
Efficient Resource Utilization | Server-Side Synchronization provides management of mailboxes and allows you to disable inactive mailboxes with the Microsoft Dynamics CRM web application. You can prevent resource hogging by applying upper limits to polling intervals and concurrent connections to external email systems. |
Migrating Email Router Profiles | Switching from the Email Router is simplified by providing the capability to migrate Email Router incoming and outgoing profiles to Server Profiles for Server-Side Synchronization. |
Service Isolation | Server-Side Synchronization has separate queue-management and configuration settings for asynchronous operations. |
Error Reporting | Server-Side Synchronization provides error logging and reporting within the Microsoft Dynamics CRM web application. |
Performance Counters | New counters have been added to the asynchronous service for measuring queue performance and email processing.
|
So what are the supported configurations?
The following table shows the support configurations of CRM and Exchange, and what items will be synchronised.
CRM Deployment Type | Email System | Email Synchronization Supported | Synchronization of Contacts, Tasks, and Appointments Supported | Protocols Used |
Online | Exchange Online | Yes | Not at RTM, but now available | Exchange Web Services |
On-premise | Exchange 2010 Exchange 2013 | Yes | Supported | Exchange Web Services |
Online and On-premise | POP3 (incoming) SMTP (outgoing) | Yes | Not supported | POP3 SMTP |
Note: Server-Side Exchange Synchronisation does not support Exchange 2007, however the email router does.
Exchange Impersonation with Exchange 2010 / 2013 On-Premise
In order for us to be able to Synchronise Appointments, Contacts, and Tasks, with an Exchange Server that is running On-Premise, we must grant the user we are going to use to connect to Exchange with the exchange impersonation role.
We can do this by going to the Exchange Server, and opening an Exchange Management Shell. Then we need to run the following command:
New-ManagementRoleAssignment -Name "CRM Exchange Service" -Role:ApplicationImpersonation -User crm-exchange.service@test.local
Where crm-exchange.service@test.local is the account we want to use to connect to exchange.
Note: If we don’t grant the exchange impersonation role to this user, when we test the mailbox later we will receive the following error in the alerts:

Testing without SSL with Dynamics CRM 2013 On-Premise
Dynamics CRM 2013 by default doesn’t allow us to save the email credentials in email server profiles and mailbox records if we don’t use SSL.
In an on-premise deployment however we can disable this for testing purpose. The setting are within the DeploymentProperties table within the MSCRM_CONFIG database, however Microsoft recommend changing this via power shell with the following command:
add-pssnapin Microsoft.Crm.Powershell
To allow the saving of credentials when SSL is not used, we can run the following commands:
$itemSetting = new-object ‘System.Collections.Generic.KeyValuePair[String,Object]'("AllowCredentialsEntryViaInsecureChannels",1)
$configEntity = New-Object "Microsoft.Xrm.Sdk.Deployment.ConfigurationEntity"
$configEntity.LogicalName="Deployment"
$configEntity.Attributes = New-Object "Microsoft.Xrm.Sdk.Deployment.AttributeCollection"
$configEntity.Attributes.Add($itemSetting)
Set-CrmAdvancedSetting -Entity $configEntity
To allow the use of connections to servers that do not use SSL, we can run the following commands:
$itemSetting = new-object 'System.Collections.Generic.KeyValuePair[String,Object]'("ECAllowNonSSLEmail",1)
$configEntity = New-Object "Microsoft.Xrm.Sdk.Deployment.ConfigurationEntity"
$configEntity.LogicalName="Deployment"
$configEntity.Attributes = New-Object "Microsoft.Xrm.Sdk.Deployment.AttributeCollection"
$configEntity.Attributes.Add($itemSetting)
Set-CrmAdvancedSetting -Entity $configEntity
Note: A guide to using PowerShell with Dynamics CRM can be found on MSDN here which has a number of useful of cmdlets for administrating a Dynamics CRM Deployment.
Testing with SSL with Dynamics CRM On-Premise
In order to test with SSL, we must add an SSL certificate to our Dynamics CRM 2013 application server, via IIS Manager.

Then we click on Create Self Signed Certificate from the right hand menu.

We enter a friendly name for the certificate and click OK.
Then we need to change the bindings on the Dynamics CRM website to allow it to use HTTPS / SSL, so we right click on the website and the click Edit Bindings.

We click on the Add button and select HTTPS from the Type drop down, we leave the port as 443 and select our newly created self-signed certificate from the SSL Certificate drop down list, and click OK.
Now we can access the server via https://test-apps-01.test.local however it is good practice to tell CRM that we are now using HTTPS via the deployment manager.

So on the Web Address tab, we select the Binding Type as HTTPS and ensure the server addresses don’t have a port number associated to them, and this is because 443 is the default HTTPS port so we don’t need to specify it.
Note: We need to install the Root Certificate Authority Certificate on to the Dynamics CRM Server, along with specifying the full qualified domain name of the server in internet explorer, otherwise we are prompted that the certificate may not be valid because the server doesn’t match the server name on the certificate, and when we come to Test the Mailbox access this will fail telling us that the certificate is not valid.
How do we set up the Server-Side Exchange Synchronisation with CRM 2013 and Exchange 2013 On-Premise?
We can set up server side synchronisation by completing the followings tasks:
1. Create an Email Server Profile.
2. Configure the Mailbox record for the users to use the newly created Email Server Profile.
3. Configure Microsoft Dynamics CRM 2013 to use Server-Side Email Synchronisation.

From Dynamics CRM we go to Settings > Email Configuration, and select Email Server Profiles.
1. We click on New > Exchange Profile from the ribbon menu
2. In Name, we type “Exchange Test”.
3. In Auto Discover Server Location, we select No.
4. In Incoming Server Location, we type “https://TEST-CORE-02/EWS/Exchange.asmx”. (Where TEST-CORE-02 is the name of our exchange server)
5. In Outgoing Server Location, type “https://TEST-CORE-02/EWS/Exchange.asmx”. (Where TEST-CORE-02 is the name of our exchange server)
6. In Authenticate Using, we select Credentials Specified in Email Server Profile. Note: if the User Name and Password fields are disabled, this is because the web application is not accessed using HTTPS and we haven't disabled SSL via PowerShell.
7. We then enter our username (including the domain) and password.
8. In Use Impersonation, we select Yes.
9. In Use same settings for Outgoing, we select Yes.
10. If necessary, we click Advanced to expand the Advanced tab and can review the settings.
11. On the ribbon menu, we click Save & Close.

Now we need to configure a user mailbox record, so from Dynamics CRM we go to Settings > Email Configuration, and select Mailboxes.
1. We double click on the User record
2. Then we can select the Email Server Profile from the list, i.e. “Exchange Test”
3. We can specify the Incoming, Outgoing and what method we wish to use to Synchronise Appointments, Contacts and Tasks.

Once we have saved the Mailbox record, we can then click on the Test & Enable Mailbox from the ribbon menu.
After a short while, when the Async process has processed the request, if everything has worked correctly and we have successfully connected to the exchange server, we will received the following messages under Alerts:

Finally we need to configure the global email settings. From Dynamics CRM we go to Settings > Email Configuration, and select Email Configuration Settings.

We can then set Process Email Using to Server-Side Synchronisation, along with specifying the default synchronisation method for our users.
Now we have successfully set up the Server-Side Exchange Synchronisation, we can log in to our Outlook Web App Server, via https://test-core-02.test.local/owa and see that we have the test email that CRM created in our inbox, along with some Appointments and Tasks. Clicking on the People tab shows our contacts from Dynamics CRM 2013.

Note: The reason we use exchange web access as opposed to outlook is that if we had the CRM Outlook Plugin installed then it could synchronise with CRM as opposed to proving that the synchronisation actually took place at the server level.
That’s pretty much all there is to it, hopefully you will have found this post useful!
@simonjen1
↧
19 de sep: El cinturón de superhéroe del experto CRM | Mesa de expertos
El cinturón de superhéroe del experto CRM | Mesa de expertos ¿Qué herramientas no puedes […]![]()
![]()
↧
↧
How To Add Microsoft Dynamics CRM Shortcuts in Outlook in Windows 8
This is one of those little issues related to CRM usability that is probably easier solved by a CRM newbie than someone who has been working with CRM for a while. In order to add CRM folders to Outlook Favorites in previous versions of Outlook and Windows, it was sometimes necessary to modify the registry.
Details about that can be found here: http://blog.customereffective.com/blog/2011/03/adding-crm-2011-entities-to-favorites-in-the-outlook-client-.html
This scared some people and the registry would sometimes reset so you would lose your shortcuts.
Unfortunately, that trick does not work with Windows 8; dragging and dropping non-Outlook items to Favorites is not allowed. So we had to come up with another method to put commonly used CRM items in a designated, easy-to-access folder. The following process is specifically related to Outlook 2013.
- First, we utilized the 'Shortcuts' area; not the 'Favorites'. Shortcuts in Outlook 2013 are located in the bottom left nav area. (Read about navigating to Shortcuts in 2010 here).
- Right click on 'Shortcuts' and 'New Shortcut Group'. Name your group 'CRM' or whatever you call you system.
- Right click on 'CRM' and 'Add New Shortcut'.
- Navigate to the CRM folder you would like a shortcut to.
Voila! And what's even better you can add your go-to Outlook items and create a true personalized experience that cuts out the clutter.
by Customer Effective Bloggers
How To Add Microsoft Dynamics CRM Shortcuts in Outlook in Windows 8 is a post from: CRM Software Blog
The post How To Add Microsoft Dynamics CRM Shortcuts in Outlook in Windows 8 appeared first on CRM Software Blog.
↧
Dynamics CRM Cross-Entity Business Process Flow
Microsoft Dynamics CRM 2013 introduced cross-entity business process flows. Up to five different entities can be combined in the same process flow.
Dynamics CRM includes an example cross-entity process flow called “Lead to Opportunity Sales Process”
In this process flow, the Qualify stage is on the Lead entity, while the develop, propose, and close stages are on the Opportunity entity.
Before a lead is qualified, the opportunity level stages are unavailable to be clicked.
After the lead is qualified, the next stages become available. When you click on the qualify stage, it toggles back to the lead form, when you click on “Develop,” it toggles to the Opportunity form.
So cross-entity process flows enable some really exciting user experiences:
- They link multiple records together in one process, providing a smooth user experience, as if they were the same record.
- They make moving between records in a process very easy (easier than popping up another window or drilling through).
Now that you are excited about cross-entity process flows, what about using them with custom entities or other system entities. What is the user experience?
Like with the standard lead to opportunity business process flow, you can define a business process flow that links up to five entities, including custom entities.
When you do, like with the lead example, when you create the first record, only the stages on the first record will be clickable. When you want to move to the second record, the user will click “next stage” on the business process flow.
When the stage advances to a stage on another entity, the user will be asked to select which related record that they want to link to (or create a new record).
This is because the related entity is a 1:N relationship, and CRM cannot decide which related record that you want linked in the process. If there is only one related record, the user will be presented that record, but the user will have to select that record to link in the process flow.
Using a real-time workflow, you could have CRM automatically create a related record to use in the process flow so the user doesn’t manually have to create the related record, but the user will still have to select that record to use in the process flow when moving the stage the first time.
Note this is a one time thing per record. Once the related record is selected, the user will never be asked again which record to link for that stage on that record.
Under the hood
So what is going on with cross-entity process flows behind the scenes? When you move the stage to the related records stage, CRM is creating a record in the process instance table. This background table stores the process ID and the GUID’s of the related records. While it is possible to populate this table directly, it is highly unsupported and not recommended, as there are additional application business processes that run when records are linked in business process flow.
What this means is that the only supported way to link records and set stages in cross entity business process flow is by users doing it manually and moving the stage via the user interface.
If you are deploying CRM now and think that a cross-entity business process flow would be of value “some day,” it may be advantageous to implement it from the beginning rather than waiting and having a large number of legacy records that are not linked when you want to start using it later.
If you have an existing CRM deployment and want to move to cross-entity process flows, think through what the impact will be to existing records. Do you need to update all of the legacy records, or can you just start with the new process on new records created going forward?
If updating existing records is a requirement, just consider that somebody will need to open each record and move the stage to one of the second entity stages.
Alternatives
So if you have a large number of existing records where you need to update the stage programmatically, what are the alternatives to cross-entity process flows?
One alternative, suggested by Carsten Groth, for situations where you need to have related records share a process flow and be able to update the stage on existing records, is to use individual process flows for each entity, but have a process like a plugin that programmatically sets the stage on the child records based on a change in the parent record.
While this approach does not give you the nice related record visibility in the master record process flow, it does tie them together in a related process, so that moving the stage on the parent record also updates the stage on the related records. Plus, you can update existing records process stages in a supported manner using tools like the Develop1 Process Flow stage workflow assembly.
by Customer Effective
Dynamics CRM Cross-Entity Business Process Flow is a post from: CRM Software Blog
The post Dynamics CRM Cross-Entity Business Process Flow appeared first on CRM Software Blog.
↧
Microsoft Dynamics CRM 2013 Change Deployment Settings via PowerShell
There a number of settings within the DeploymentProperties table within the MSCRM_CONFIG database which sometimes we need to change. Microsoft recommend changing this via power shell with the following command:
add-pssnapin Microsoft.Crm.Powershell
To allow the saving of credentials when SSL is not used, we can run the following commands:
$itemSetting = new-object ‘System.Collections.Generic.KeyValuePair[String,Object]'("AllowCredentialsEntryViaInsecureChannels",1)
$configEntity = New-Object "Microsoft.Xrm.Sdk.Deployment.ConfigurationEntity"
$configEntity.LogicalName="Deployment"
$configEntity.Attributes = New-Object "Microsoft.Xrm.Sdk.Deployment.AttributeCollection"
$configEntity.Attributes.Add($itemSetting)
Set-CrmAdvancedSetting -Entity $configEntity
To allow the use of connections to servers that do not use SSL, we can run the following commands:
$itemSetting = new-object 'System.Collections.Generic.KeyValuePair[String,Object]'("ECAllowNonSSLEmail",1)
$configEntity = New-Object "Microsoft.Xrm.Sdk.Deployment.ConfigurationEntity"
$configEntity.LogicalName="Deployment"
$configEntity.Attributes = New-Object "Microsoft.Xrm.Sdk.Deployment.AttributeCollection"
$configEntity.Attributes.Add($itemSetting)
Set-CrmAdvancedSetting -Entity $configEntity
There are also a number of other settings across a CRM Deployment which we can change via PowerShell:
To Enable Tracing, we can run the following commands:
$setting = Get-CrmSetting TraceSettings
$setting.Enabled=$True
Set-CrmSetting $setting
Get-CrmSetting TraceSettings
CallStack : True
Categories : *:Error
Directory : c:\crmdrop\logs
Enabled : True
FileSize : 10
ExtensionData : System.Runtime.Serialization.ExtensionDataObject
To Disable Tracing, we can run the following commands:
$setting = Get-CrmSetting TraceSettings
$setting.Enabled=$False
Set-CrmSetting $setting
Get-CrmSetting TraceSettings
CallStack : True
Categories : *:Error
Directory : c:\crmdrop\logs
Enabled : False
FileSize : 10
ExtensionData : System.Runtime.Serialization.ExtensionDataObject
The following table shows some of the settings that can be changed via PowerShell.
Configuration settings class name | Description |
Contains settings values regarding asynchronous jobs and can be used to tune the asynchronous processing service. | |
Contains settings for claims authentication. | |
Contains settings that pertain to running custom code. | |
Contains settings for dashboards. | |
Contains settings that tune the operation of duplicate detection. | |
Contains settings for enterprise transaction management that can be used to throttle CRM for Outlook. | |
Contains settings for Internet facing deployments. | |
Contains settings that tune a data import operation. | |
Contains settings for the Marketplace. | |
Contains monitoring settings. | |
Contains settings for multi-entity quick find (finds records of different types). | |
Contains settings for quick find (finds records of one type). | |
Contains settings for controlling server side synchronizations for accounts, contacts and tasks. | |
Contains settings for controlling server side synchronizations for emails. | |
Contains settings for controlling server side synchronizations for queues. | |
Contains SQM settings. | |
Contains settings for auto created (system-managed) access teams. | |
Contains settings which can be used to throttle CRM for Outlook. | |
Contains settings that tune the amount of trace information generated. | |
Contains deployment root domain address values. | |
Contains deployment wide workflow settings. | |
Contains settings for Yammer. |
Note: A guide to using PowerShell with Dynamics CRM can be found on MSDN here which has a number of useful of cmdlets for administrating a Dynamics CRM Deployment, you can also see a list of all of the Advanced Settings that can be changed via PowerShell here.
This is a short tip but can be usefully if you want to quickly change a setting within a CRM 2013 Deployment.
@simonjen1
↧