When starting to develop solutions with Dynamics CRM it is important to understand where the solution can exist and what features and functionality are available to you.
The Big Difference?
The key...(read more)![]()
↧
Developing Dynamics CRM Applications In or Out of Process
↧
Document Generation in Dynamics CRM 2016
In this article, we will review the new and improved out-of-the-box capabilities to generate documents that contain data from CRM records. Users can now create Word and Excel templates for letters, agreements, quotes, invoices and other, in just a single click!
Out of the box Templates
Out of the box, here are the templates Microsoft includes with the CRM 2016 release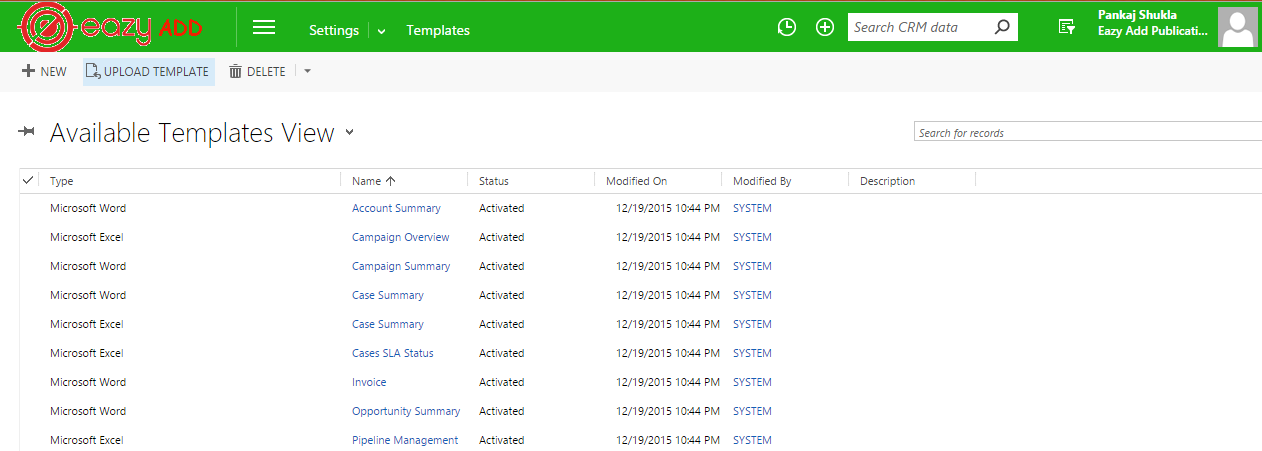
Figure 1.0 1
To run the Template you’ll first need to select the appropriate record. For the Account Summary Template, select an Account record and select it from the Action menu. As shown in Figure 2.0 1.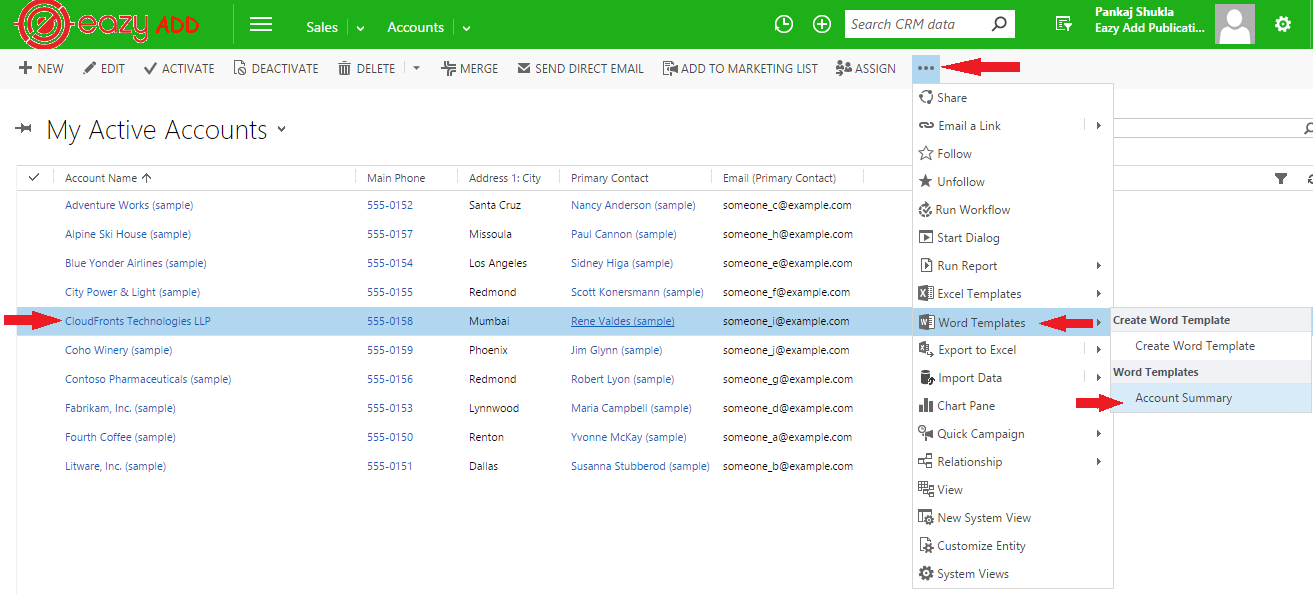
Figure 2.0 1
Account (Cloudfronts Technologies LLP) Summary template is generated.
Figure 3.0 1
Open the Account Summary.docx file.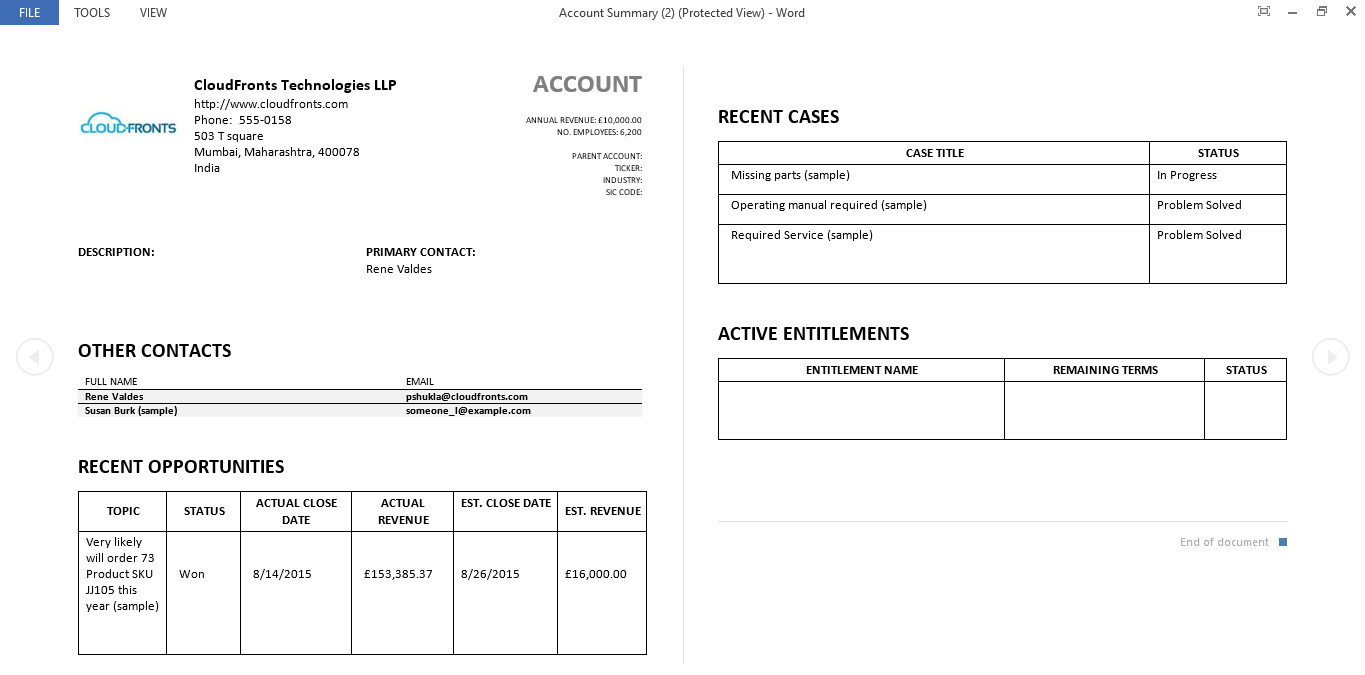
Figure 4.0 1
Create a new Excel Template
Go to Settings – Templates – Document Templates. Click on +New to launch the wizard.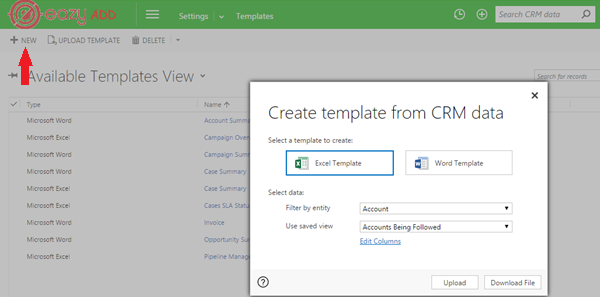
Here you can select either Excel or Word templates, the entity and the View. The Edit Columns link provides users a quick way to add columns to the template similar to that of an Advance Find. CRM knows where to display the template file based on the entity selection.
If you already have a template, choose Upload, otherwise choose Download to see what CRM created as the Template based on your field selections.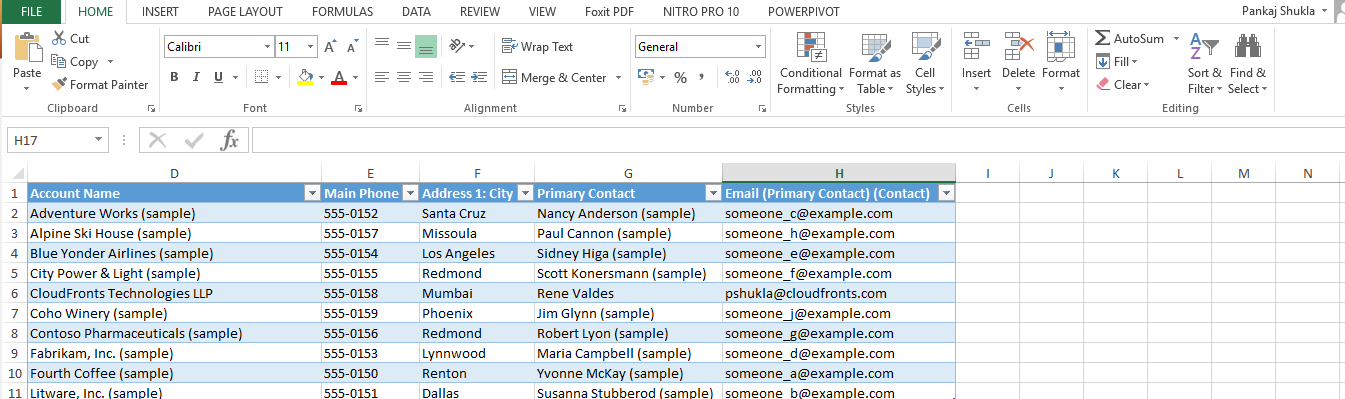
Figure 5.0 1
To upload a file we need to just drag & drop in the box and click the upload button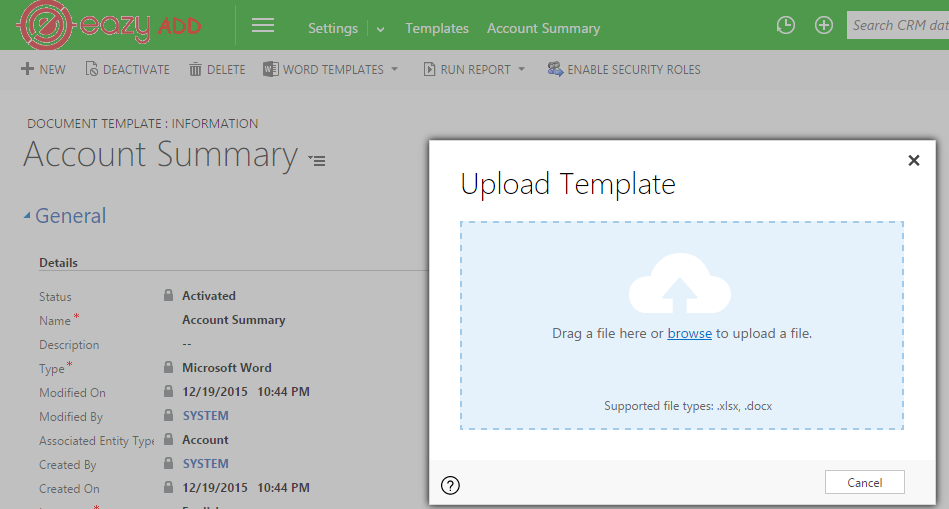
Figure 6.0 1
Once the upload is complete, the template record is displayed.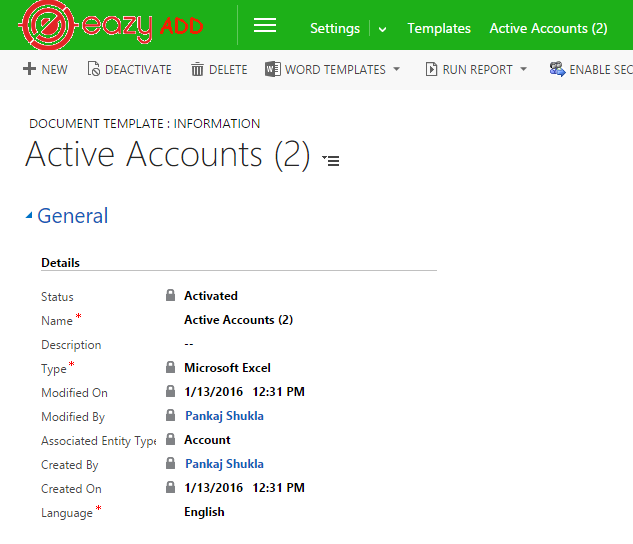
Figure 7.0 1
Once you have selected the Template, you also have the ability to set the security roles and control.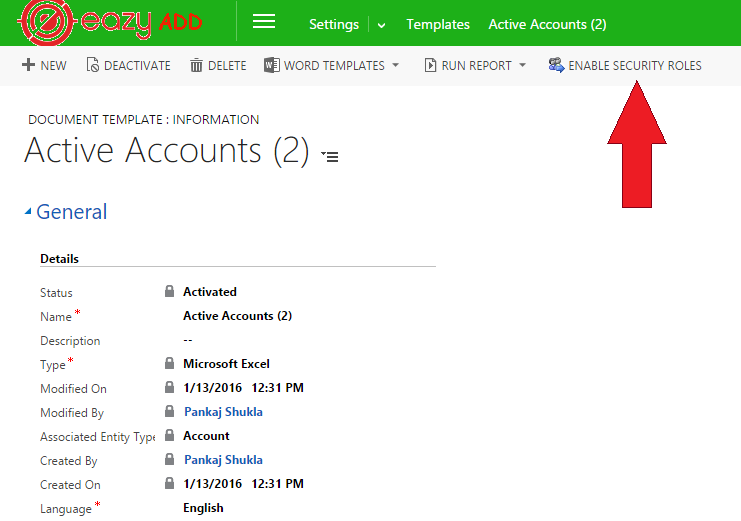
Figure 8.0 1
Create a Word Template
Go to Settings – Templates – Document Templates and click +New. Choose the Word Template, select the entity and press Select Entity button.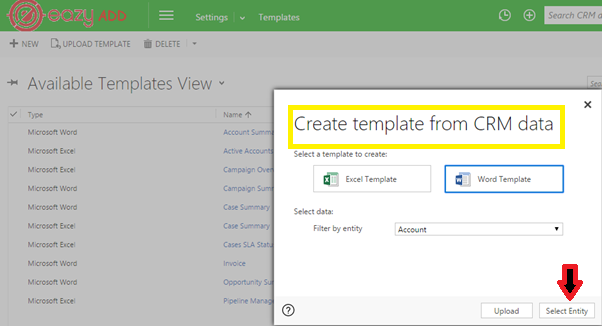
Figure 9.0 1
A wizard form opens to provide options in navigating across various entities depending on the relationship types.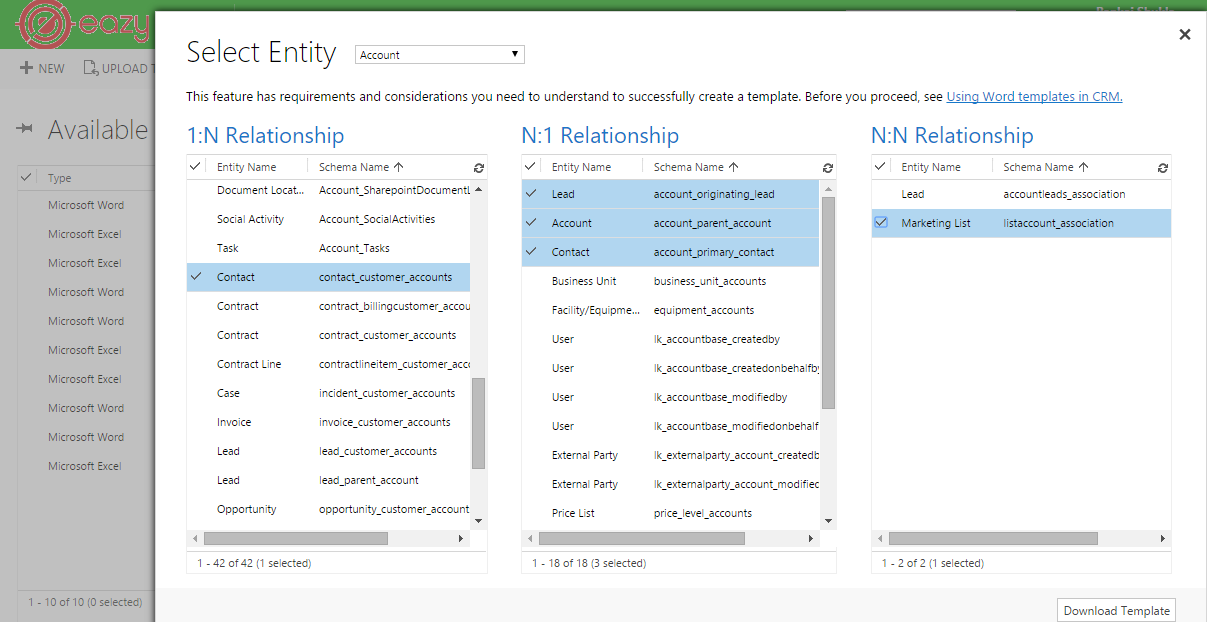
Figure 10.0 1
The relationships you select on this screen determine what entities and fields are available later when you define the Word template. Only select relationships you need to add CRM data to the Word template.
Click Download Template on the Select Entity page to create a Word file on your local computer with the exported entity included as XML data.
Enable the Developer Tab
Open the Word template file. At this point, the document appears to be blank.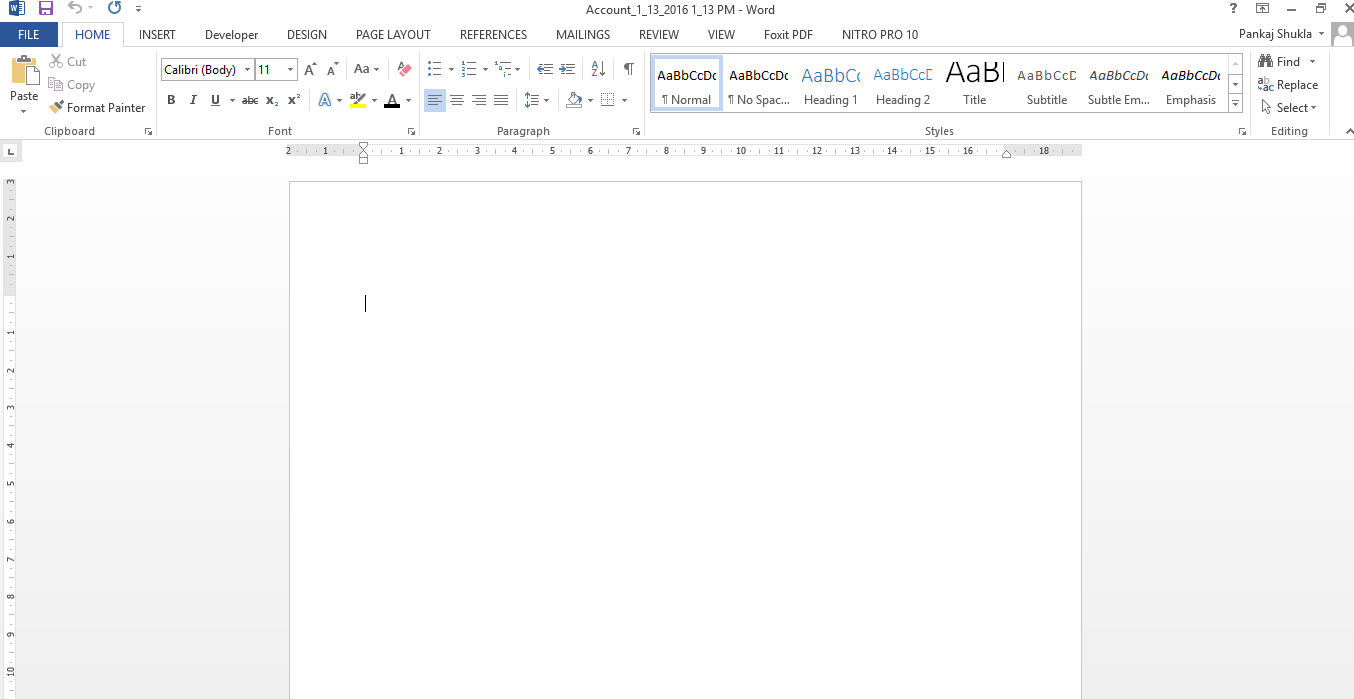
Figure 11.0 1
For To see and add CRM XML data, you need to enable the Word Developer tab.
Go to File > Options > Customize Ribbon, and then enable Developer.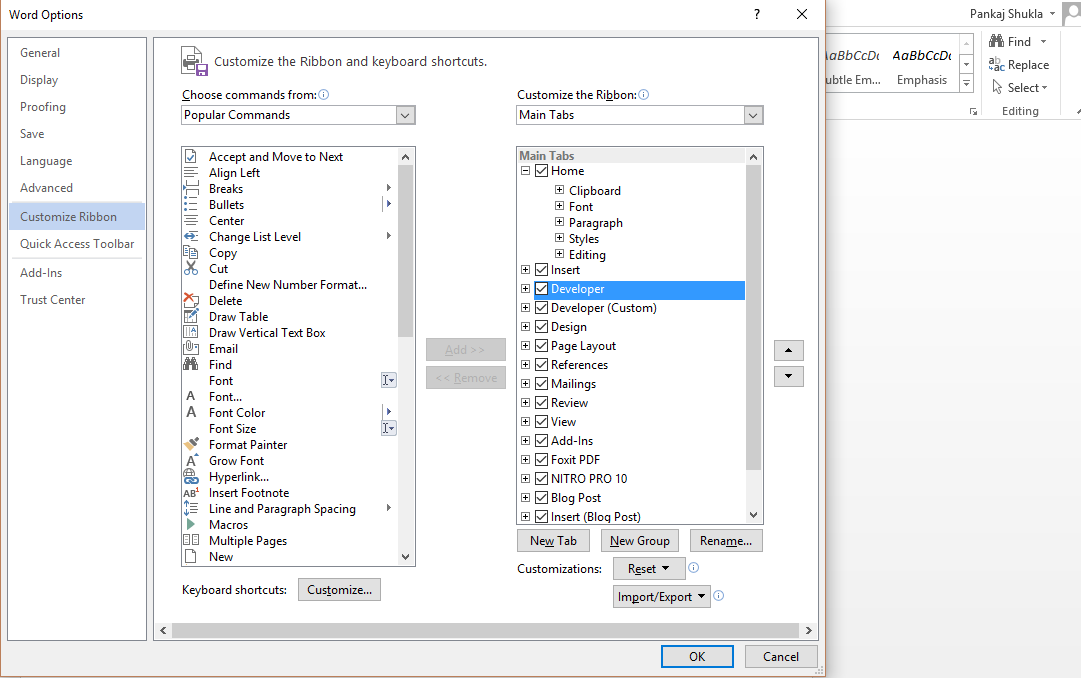
Figure 12.0 1
Developer now appears in the Word ribbon.
Figure 13.0 1
You use the XML Mapping Pane to add CRM entity fields to your Word template. Be sure to only add fields as Plain Text or Picture.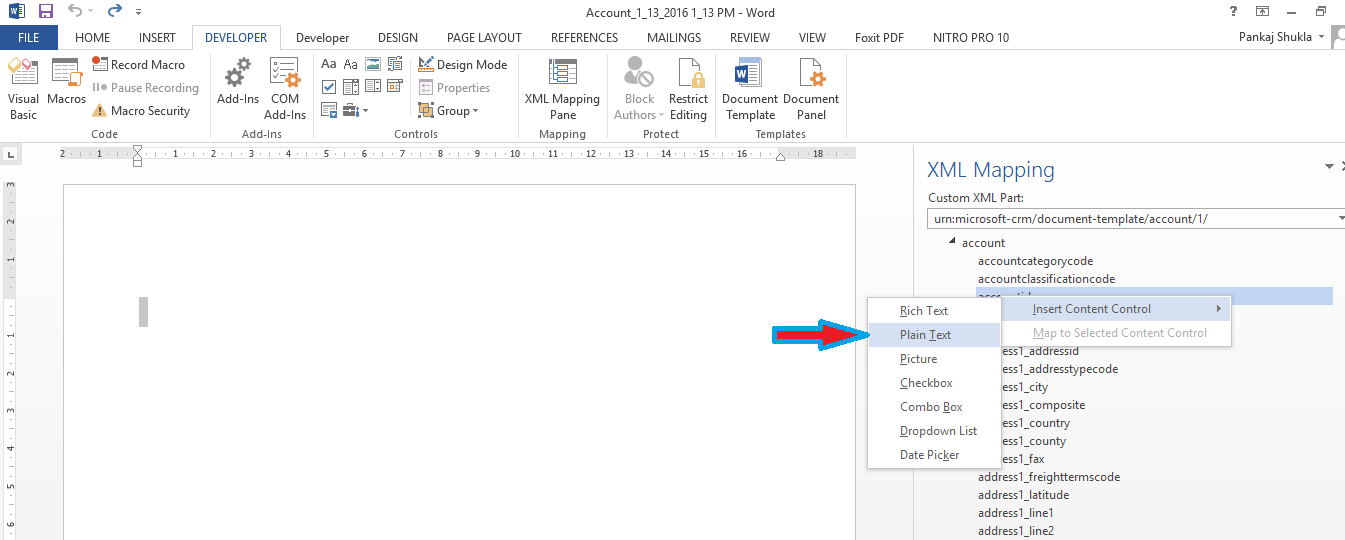
Figure 14.0 1
Define the Word template
Use the XML Mapping Pane to define the Word template with CRM entity fields.
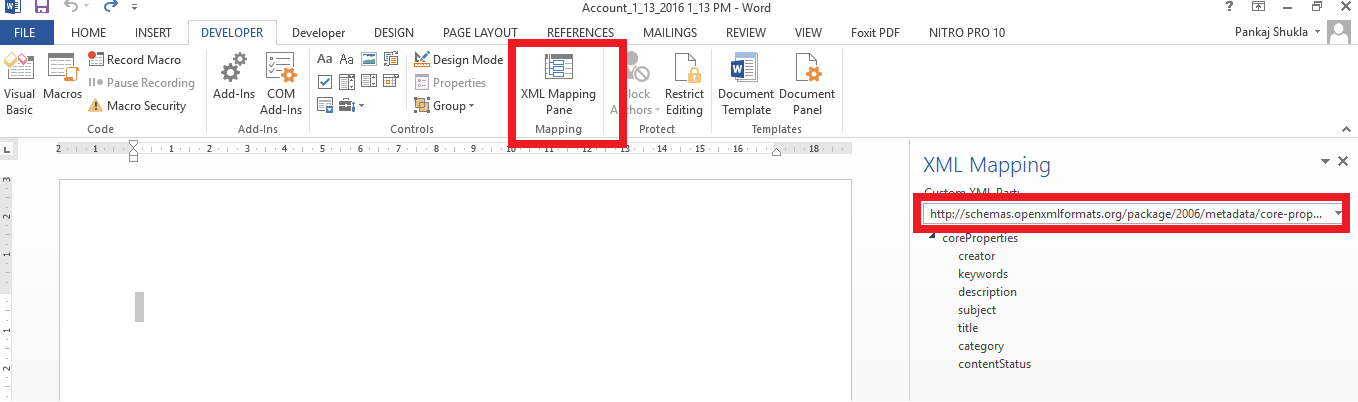
- In your Word template, click Developer > XML Mapping Pane
![16]()
Figure 15.0 1
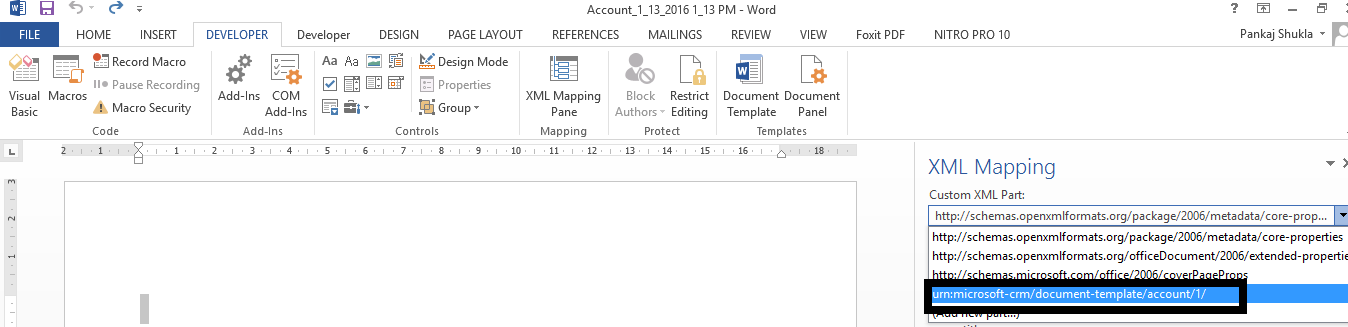
The default XML schema is selected. - Select the CRM XML schema. It will begin with “urn:microsoft-crm/document-template/”.
![17]()
Figure 16.0 1
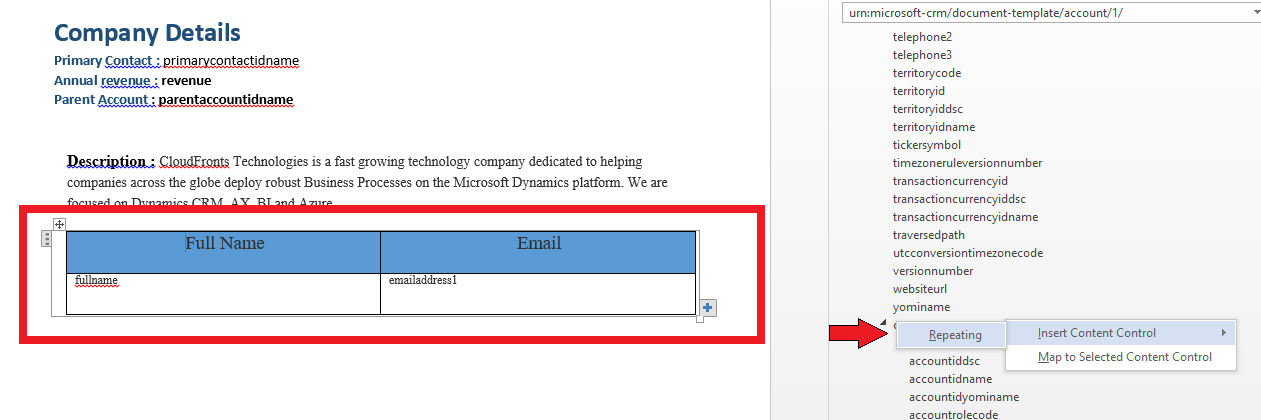
- Expand the CRM entity, right-click the entity field, and then clickInsert Content Control > Plain Text.
![18]()
Figure 17.0 1
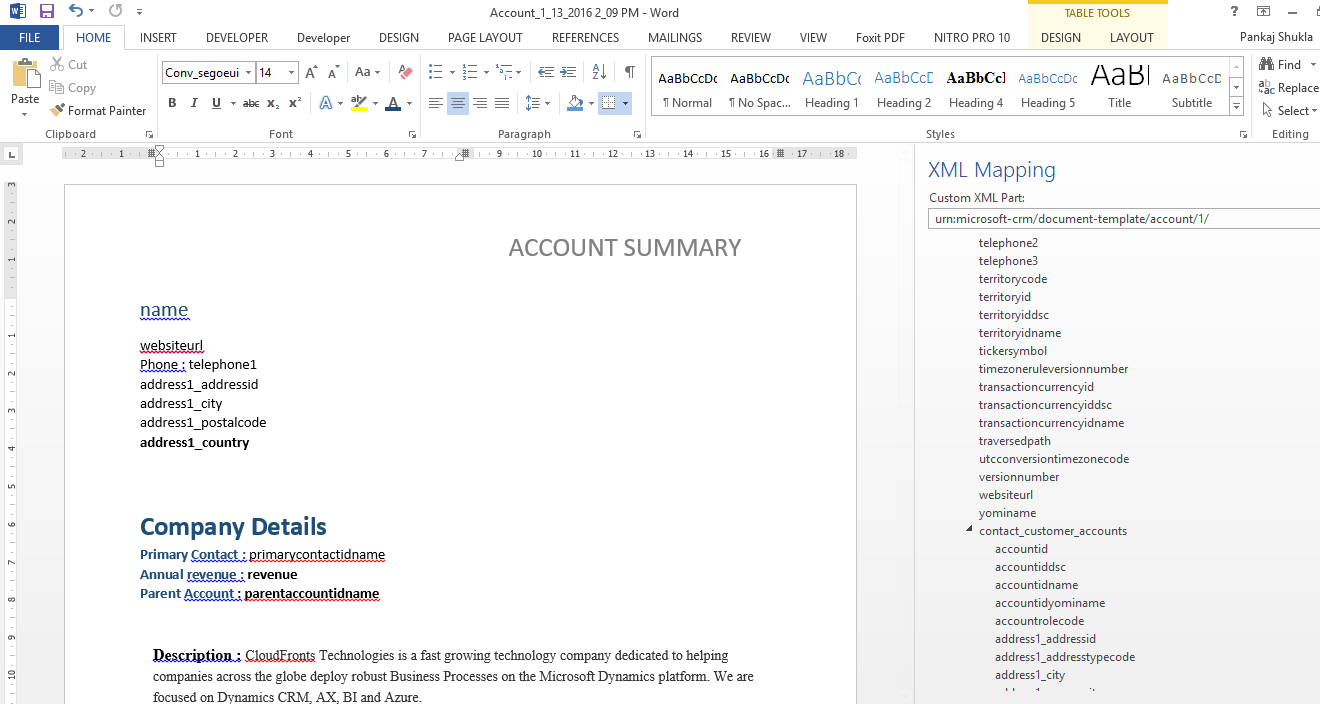
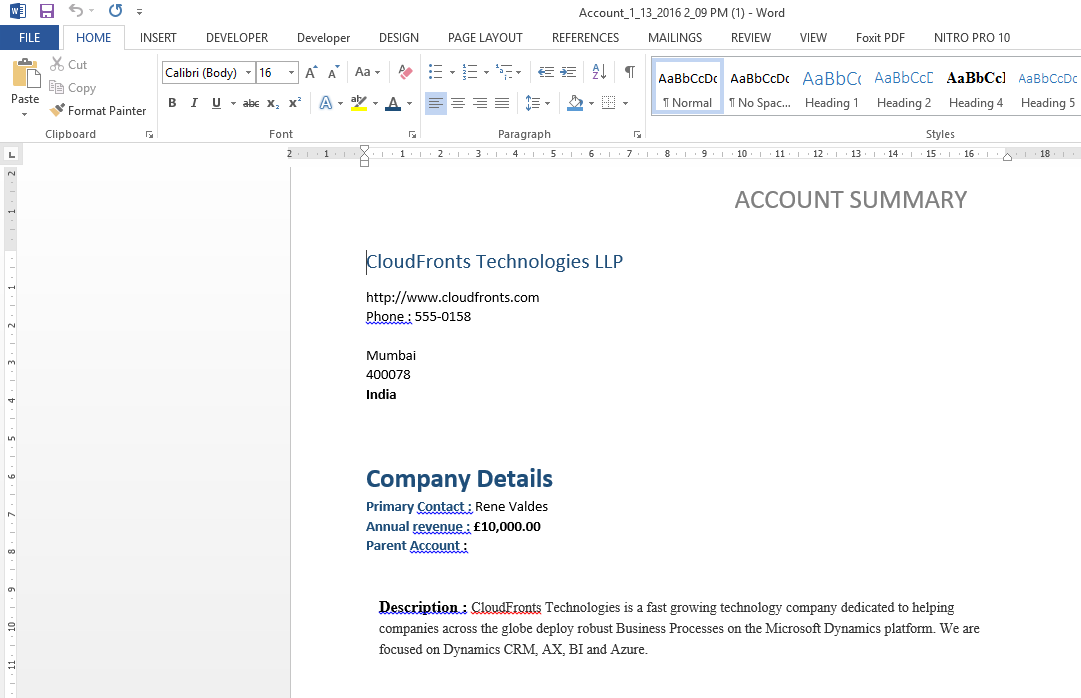
The CRM entity field is added to the Word template. Add additional entity fields, add descriptive labels and text, and format the document.A completed template might look like this:
![19]()
Figure 18.0 1
Some content control fields you entered likely have multiple lines of data. For example, accounts have more than one contact. To include all the data in your Word template, set the content control field to repeat.Set content control fields to repeat
- Put fields with repeating data in a table row.
- Select the entire table row in the template.
- In the XML Mapping Pane, right-click the relationship containing the content control fields, and then click.
![20]()
Figure 19.0 1
When you use the Word template in CRM to create a document, the table will populate with multiple rows of data.When the template has the fields and formatting you want, save it and upload it into CRM.

Upload the Word template back into CRM
When you have your Word template built the way you want, save it so you can upload it into CRM.
To use the Word template you’ve created, do the following:
- Open a record with information you want to create a document. For example, open a customer account record in Sales.
- ClickMore (…) > Word Templates, and then under Word Templates select the template you created.
![21]()
Once generated, documents can be downloaded and then printed, shared, emailed or collaborated on with Microsoft Office 365
The post Document Generation in Dynamics CRM 2016 appeared first on CloudFronts - Microsoft CRM | AX | BI | Azure.
↧
↧
Security model of Microsoft Dynamics CRM
Microsoft Dynamics CRM provides a security model that protects data integrity and privacy and supports efficient data access and collaboration. Following are the main goals of the security model:
• Provide...(read more)![]()
↧
Microsoft Visio
Now that Adult Coloring Books have exploded on the marketplace perhaps it is time for you move from the joys of PowerPoint (Admit it, you love it because it is easy creativity) to the joys and the incredible POWER of VISIO or SWAY (but I will save SWAY for another post)!
Do you have processes? Do you want to get these processes to be adopted and consistent across all departments? Why not drop them into a SIMPLE VISUAL DIAGRAM and post them around the office?
Or you can really get into it and use them to "visualize the future state of transformative initiatives" or to "stay on top of operational insights". It is true that a picture can communicate 1000 words and in this noisy world, using a picture to communicate can make a huge difference (even for the most sophisticated).
To learn more about the new features of Microsoft Visio you can read up about it on the Microsoft office team's blog. I even enjoy older posts like this one which is already a year old!
Microsoft Office Blog on VISIO
↧
How to Plan for an Awesome Agile CRM Implementation
While documentation can be limited in Agile methodologies, it is not forgotten. As with any implementation, implementing a large scale application in an Agile environment has its challenges. With so many dependencies and related functionality, identifying distinct separation of duties is critical and cannot be overlooked. In today’s blog, we![]()
![]()
![]()
![]()
![]()
![]()
![]()
↧
↧
Microsoft Dynamics Partner Roundup: AX supply chain solution; New Dynamics practice hire; EMEA Partner Program member; E-signature ISV growth
In this week's Microsoft Dynamics partner news roundup:
- I.B.I.S Rolls Out Next-Gen Advanced Supply Chain Software
- Dan Blake Joins SC&H Group's New Dynamics Consulting Practice
- Advanced ConsultCRM Part of the EMEA's Dynamics Partner Program
- AssureSign Doubles Annual Revenue
I.B.I.S Rolls Out Next-Gen Advanced Supply Chain Software
I.B.I.S. Inc., a Sonata Software company, has a new release of Advanced Supply Chain Software for Microsoft Dynamics AX.
The new release adds three new modules to Advanced Supply Chain Software: Advanced Sales and Operations Planning, Advanced Procurement Management and Advanc...
↧
CRM-driven Sales Methodologies
A sales process could be defined as a series of systematic, measurable steps marking out the path and the interactions with prospects throughout the sales cycle. An efficient sales process is the key to success for a sales team.
When a sales process is heavily used by the team, it can be improved by including various concepts and steps in it to satisfy the requirements of the business environment. A CRM tool can automate a set of calculations and functions while supporting not only the sales process, but especially the work of the sales team. Most CRM tools provide, or initially offer, one or more sales processes.
 A sales methodology is a more strategic exercise that provides guidance, a message, a strategy and activities that can ultimately be used in any sales process.
Different methodologies have been used by sales organizations over time: Relationship Selling, published in 1936, ADAPT Method, Xerox System, Professional Selling Skills (PSS), Strategic Selling, SPIN Selling, Solution Selling (2000), Challenger Sales (2011), and SNAP Selling (2012).
The latest methods can be put to use immediately in most organizations, but it would still be worthwhile to explore those various methodologies to find out which one would best fit your company or, at least, to confirm that your operational processes are consistent with industry best practices.
For example, besides tools and functions, the Challenger Sales method gives managers and reps the benefit of a common language, strategy and goals. A CRM tool supporting a sales process—steps and activities—based on the Challenger Sales method enables and encourages a proactive customer approach because it can be used to capture and exploit customers’ data.
The CRM solution has very considerable potential for standardizing methods and processes. “Real time” access to data coming from sales activities provides a major competitive edge and makes it easier to transition from a product-centric to a customer-centric vision.
Click here for the full chronicle.
By Gestisoft
This article is an abstract from the CRM Chronicles in the Gestisoft blog...
The post CRM-driven Sales Methodologies appeared first on CRM Software Blog.
↧
Sending WebHooks with Microsoft Dynamics CRM
Applies to: CRM Online 2016 Update, CRM 2016, and CRM Online 2015 Update 1.
Microsoft Dynamics CRM has a robust customization framework for tailoring how it works to any business need. Here, we will show how to use workflows and custom workflow activities to send WebHooks from CRM to an external web service.
About WebHooks
WebHooks is a lightweight HTTP pattern for connecting Web APIs and services with a publish/subscribe model. WebHook senders notify receivers about events by making requests to receiver endpoints with some information about the events. Microsoft ASP.NET provides a preview project for working with WebHooks, which is also available on GitHub.
Architecture overview

To send a WebHook, we need to know the events that will trigger it, the receiver to which it will be sent, and data about the event. Each of these is readily available in CRM workflows.
CRM workflows have a set of workflow triggers that align well with the common events that we may wish to send: create, set state, assign, update, and delete. We will leverage these events to kick off the process of sending a WebHook.
The business entity that triggered the event is available both to the workflow and to custom code that is run from the workflow. As we will see below, both workflows and custom workflow activities can perform additional processing before sending a WebHook, which enables scenarios like filtering when a WebHook should be sent based on privilege or the value of a field.
Custom workflow activity
The core of a WebHook is a HTTP POST request made by the sender to an endpoint in the receiver. This is implemented using a custom workflow activity that creates a JSON object for the event data and posts it to a designated receiver endpoint. We’ll use the custom workflow activity template from the Developer Toolkit for Microsoft Dynamics CRM to create the activity. For more information about how to install the Developer Toolkit, see Install or uninstall the Developer Toolkit.
The URL of the receiver endpoint is provided using an input argument that is configured when the custom workflow activity is added as a workflow step. We can also provide additional input arguments to the workflow. In this example, a shared secret used to validate the origin of a WebHook is configured using another input argument.
using System.Activities;
using Microsoft.Xrm.Sdk.Workflow;
namespace Microsoft.Xrm.Samples.WebHooks
{
public class SendWebHook : WorkFlowActivityBase
{
[Input("WebHook receiver URI")]
public InArgument<string> ReceiverURL { get; set; }
[Input("WebHook receiver secret")]
public InArgument<string> ReceiverSecret { get; set; }
public override void ExecuteCRMWorkFlowActivity(CodeActivityContext context, LocalWorkflowContext crmWorkflowContext)
{
// ...
}
}
}
Since this class is a custom workflow activity, we can use all of the features that are available to workflow activities, including the CRM organization service, plugin tracing service, managed-type serialization using data contracts, and HTTP(S) connections. For more information on what you can do inside a custom workflow activity, see Custom workflow activities (workflow assemblies) and Plug-in isolation, trusts, and statistics.
When the custom workflow activity is completed, it can be compiled into an assembly and registered with CRM using the Plugin Registration Tool. For information on using the Plug-in Registration Tool to register a custom workflow activity assembly, which is similar to registering a plug-in assembly, refer to the CRM SDK topic Register a plug-in using the plug-in registration tool. For more information on registering a custom workflow assembly see Register and use a custom workflow activity assembly.

Sending WebHooks with workflows
To set up CRM to use the custom workflow activity to send a WebHook, we’ll leverage the event pipeline and workflow triggers. We’ll define a workflow that triggers for our basic scenario (in this example, when creating an account). In the CRM application, choose Settings > Processes > New to create a new workflow process.

Inside the workflow editor, we should see that the custom workflow activity is available as an option for a workflow step. Add it to the workflow and configure the activity properties with the URL of the WebHook receiver, and the other required input arguments.


The URL of the WebHook receiver should be in the format https://<host>/api/webhooks/incoming/dynamicscrm. In this example, the host name is “sampledynamicscrmwebhookreceiver.azurewebsites.net”. Here we have neglected to enforce that the WebHook receiver use HTTPS. It is recommended that you use HTTPS for your business application for enhanced security. We have also provided a shared secret that identifies CRM to the WebHook receiver. You should provide your own application secret for your business application. As always, use high-entropy values such as a SHA256 hash or similar, which you can get from FreeFormatter Online Tools For Developers. You can also set your application secret through the Azure Portal instead of hard-coding it in the Web.config file.
You can add more steps to the workflow to customize the way the WebHook will be sent. For example, you can add a condition step so that the WebHook will only be triggered if the account’s primary contact has an email address at a particular domain.
Once you’re satisfied with your workflow, save it. We’ll activate the workflow later, once the receiver is set up. Now, let’s build a simple receiver to observe the WebHooks.
Receiving WebHooks in your web application
Add the NuGet package for the ASP.NET WebHooks receivers for CRM to your web project in Visual Studio using the NuGet package manager, or by typing Install-Package Microsoft.AspNet.WebHooks.Receivers.DynamicsCRM -Pre into the package manager console. This example uses a Web API project created from the default Visual Studio ASP.NET project template. Remember that ASP.NET WebHooks is a preview package, so you must select Include Prerelease in the NuGet package manager window to install it.

Alternatively, you can clone the ASP.NET WebHooks project from GitHub, check out the dev branch, and build the NuGet package from source.
Create a handler that will respond to the WebHooks, following the instructions in the introduction to Microsoft ASP.NET WebHooks:
using System.Threading.Tasks;
using Microsoft.AspNet.WebHooks;
public sealed class SampleDynamicsCrmWebHookHandler : WebHookHandler
{
public override Task ExecuteAsync(string receiver, WebHookHandlerContext context)
{
// Get the event data.
JObject data = context.GetDataOrDefault<JObject>();
// ...
return Task.FromResult<bool>(true);
}
}
Then add the following line to the end of Register() in WebApiConfig.cs to have ASP.NET WebHooks configure routes in your web application for handling WebHooks:
// Web API routes
config.MapHttpAttributeRoutes();
// ...
config.InitializeReceiveDynamicsCrmWebHooks();
Finally, add the secret that you provided to the custom workflow activity in your application settings. Use a high-entropy value such as SHA256 or similar. You can define the secret in your Web.config or in the Azure Portal.
<appSettings>
<add key="MS_WebHookReceiverSecret_dynamicscrm" value="The secret you provided to the custom workflow activity -- 32-128 bytes of high entropy data" />
</appSettings>
When you rebuild and publish your web application, WebApiConfig will initialize the WebHook routes in your web application during startup and register the WebHook receiver and handler with the ASP.NET WebHooks framework. When a WebHook is received, the ASP.NET WebHooks framework will dispatch the event to your handler for processing.
Try it out
The source for the custom workflow activity for CRM that we’ve developed above is available here.
For this section, let’s suppose that you are publishing your WebHook receiver in your web application to an Azure website.
Add the CRM WebHook receiver to your web application project, as shown above, and rebuild it. Then publish it to your website from Visual Studio by selecting the web application project in Solution Explorer and choosing Build> Publish […].

Make sure the publish configuration is set to Debug so that you can attach the debugger to your web application.

Once your web application is published, open the Server Explorer pane in Visual Studio and navigate to your web application under Azure>App Service. Right-click on the web application’s entry and choose Attach Debugger, then set a breakpoint in the WebHook handler.

Now go back into the CRM application and activate your workflow. Next, create and save a new account in CRM. After a few seconds, the breakpoint in the WebHookHandler subclass in your web application should be hit, showing the data from the new account. This means that the event was successfully sent to the web application.


We look forward to seeing what you’ll do with WebHooks and Microsoft Dynamics CRM.
Cheers,
Andrew Shen
↧
January 15 Blog Review
Let’s jump right in to the news of the week with Microsoft announcing Microsoft Envision . This is replacing Convergence and will focus on strategic leadership and Microsoft Dynamics. If you want focused...(read more)![]()
↧
↧
Añadir ficheros adjuntos en emails desde otras entidades (Workflow Tools)
Buenas a todos, yo sigo con lo mío….y lo mío es cada día explorar nuevas cosas que puedan hacer falta …![]()
![]()
↧
Debug your web resources efficiently in Dynamics CRM
Sometimes the most simple stuffs are the most appreciated ones. The same goes about this topic. There is nothing very geeky or some advanced feature of Dynamics CRM that I am going to talk about here....(read more)![]()
↧
Gentlemen Prefer Solutions: The Expanding Dynamics CRM Footprint
If you haven’t worked with CRM Online using Office 365 Global Admin rights recently, you might have missed the new delivery mechanism that Microsoft has created for additional CRM functionality not included in a new Online org by default: preferred solutions. Unlike the traditional solution import mechanism under the CRM application’s Settings area, these preferred solutions are both installed as well as updated (upgraded) via a miniature “CRM app store” controlled by and reserved for Microsoft exclusively. To access these preferred solutions you need to go to the O365 Admin Portal, open the CRM Online Administration Center, choose an instance and click the edit icon next to “Solutions”. You’ll be presented with a list like this one:

OK, maybe not exactly like this one, unless you work in the United States. You see, these preferred solutions are also targeted to preferred customers, meaning in practice CRM Online customers who use a tenant located in North America. Let me point this preferred region out to you from the Office 365 and CRM Online datacenter map:

The current availability of the preferred solutions is as follows:
- Insights for Microsoft Dynamics CRM Online: powered by InsideView, this service is free for CRM Online US customers only. Presumably due to the fact that their database wouldn’t have very good coverage of companies in other parts of the world. You could of course buy the service from InsideView directly if you really must have it.
- FantasySalesTeam: acquired by MS in August 2015, this gamification solution is built on the concept of fantasy sports that’s apparently a huge industry in the US but less familiar in most other regions. Sales people all around the world surely are a competitive species but no one turns the competition into entertainment quite like the Americans do. Expanded availability of the preview is coming any day now.
- Voice of the Customer: built in the UK and acquired by MS in March, the solution formerly known as Mojo Surveys has been launched in preview mode for US customers only. Ouch. Well, don’t worry, this feedback management solution will surely come to other geos quite quickly (or MS will need to deal with some customer feedback of their own…)
- Office 365 Groups: not acquired from anywhere but rather an original Redmond design, this solution became available already back in CRM 2015 Update 1 (v7.1) time frame as a preview globally (yay!)and is now available in full production support mode to all CRM Online customers.
- FieldOne Sky: only the sky’s the limit for this solution that’s available to CRM Online users with Professional licenses, no matter where your field service personnel may roam. Acquired in July 2015, FieldOne is running mostly on Microsoft’s XRM platform, but the mobile client still relies on Resco and allows only access to a subset of CRM default entities, so for broader mobile use you’ll still need to buy a separate Resco license.
Although not a CRM solution in technical terms, it’s also worth mentioning that the CRM App for Outlook which was released as US only preview last summer is now available to all CRM Online users who are on CRM 2016 version. I haven’t seen any upgrade time slots being scheduled for existing CRM Online customers yet, so currently mostly newly provisioned orgs can access the Settings – CRM App for Outlook menu to enable users for this lightweight successor to the “heavyweight” Outlook client of the past.

With all the goodies deployed in a CRM Online trial org in North America, this is how your CRM Nav Bar will look like with the new areas added for FieldOne Sky, Voice of the Customer and FantasySalesTeam:

Quite a lot going on there, don’t you think? We haven’t yet even installed the latest Microsoft XRM acquisition, Adxstudio, into our organization, nor done any customization for creating new entities to hold customer business process specific data and we’ve already got a whopping 4459 components in our CRM organization’s default solution, including 264 entities visible via the customization UI. Knowing that at the last time Shan McArthur counted them, Adxstudio Portals included 155 entitites when installing all the vertical solutions into a single CRM instance, we’ll be pushing beyond four hundred entities in a Dynamics CRM Online environment before deploying anything that’s custom or ISV produced.
 This ain’t your grandpa’s customer database anymore, that’s for sure. Back in CRM 2011 days, which was only five short years ago, the world looked very different through the eyes of a Microsoft business consultant. Check out my 5 year blogging retrospective if you want to enjoy a more scenic trip down the memory lane, but for now let’s just focus on the expanding CRM schema. During a recent migration project I ran into a document from MS that included a comparison of the database complexity between Siebel and Microsoft Dynamics CRM. At that point, CRM 2011 was stated to have less than 200 database tables, whereas Siebel 8.1 was a monstrosity consisting of more than 2000 tables. We of course have to keep in mind that the actual table count is higher than the number of visible entities in Dynamics CRM, and that many of the system entities are not something that a user will ever encounter in the CRM UI. Anyway, the rate of growth in entity count for a Dynamics CRM environment with standard Microsoft functionality is quite impressive.

Does the entity count matter? Purely in itself, not really, as it’s just virtual table structures in a database management system that doesn’t have any feelings towards what’s “too little” or “too much” when it comes to the amount of bits. It is, however, an indicator of important changes that are taking place around the CRM platform:
- Microsoft is using Dynamics CRM as a platform for delivering new business applications, rather than maintaining many isolated apps with their own architecture
- Data from these various applications is managed inside a single CRM database, right next to the customer master record around which the business processes are modeled
As detailed in my earlier “XRM Strikes Back” post, I believe the success rate for this type of applications is going to be higher than when trying to build integrations and connectors between separate data silos. If we want to push CRM to the next level and really start to build systems that help companies achieve better Customer Engagement, then things aren’t about to become any simpler as the number of channels and amount of data types we need to work with keeps growing in exponential fashion. For some great insight on CRM’s role in the new CEM/CX jungle, go and read Paul Greenberg’s definition on how these three acronyms need to be positioned, as well as his list of 18 customer engagement technologies that companies need for supporting their CEM strategies. While they most definitely can’t all be built into one monolithic system, it’s equally obvious that we can’t know in advance what specific bits and pieces different organizations need when engaging in continuous interactions with their customer base. We therefore need the flexibility to configure and adjust these processes as the expectations for the engagement paths evolve, and achieving this agility requires not a set of products but a business process platform – like XRM, for example.
If the destiny of these central platforms is to expand in their coverage of channels and processes, it means we’ll need to develop the skills & strategies to cope with this change. Thinking about the example of preferred solutions now offered as optional components for any Dynamics CRM Online environment (and eventually on-premises, too), clearly not every customer organization is going to need all the components, but that doesn’t mean they wouldn’t gradually become a part of the package we think of as Dynamics CRM. Below is a list of the entities you have after installing the solutions (click for a larger version):

I bet this would make a great drinking game for CRM consultants: “Default or Custom?” You pick the name of an entity and the players must tell whether it comes as a part of CRM delivered by Microsoft or if it’s a custom created entity.
- “SLA?” – “Easy, that’s default!”
- “Question?” – “Umm, well, I think that survey solution might contain one…”
- “Resource Skill?” – “I’m flipping a coin here, let’s stick to default.”
- “Warehouse?” – “Hell no, this is CRM, not ERP! What? Default?!? You’ve gotta be sh***ing me! [drinks a shot]”
Continue until the bottle is empty, then launch Dynamics Marketing and crack open a new bottle of vodka… But seriously, there’s going to be a lot of work ahead of us to learn what might come as an OoB feature and how to align these with custom entities. For example, let’s assume an organization has integrated payment data from their financial system into their CRM account profiles. Then along comes FieldOne Sky and these new “Payment”, “Payment Details”, “Payment Method” and “Payment Term” entities appear in the CRM data model. What are you gonna do? I don’t have an answer nor recommendation for you at this point, but it just goes to show that we all better start educating ourselves on what these new preferred solutions have to offer.
The post Gentlemen Prefer Solutions: The Expanding Dynamics CRM Footprint appeared first on Surviving CRM.
↧
FieldOne Sky – Resource Start Locations
I’ve recently been asked a question about resource start locations in FieldOne Sky for Microsoft Dynamics CRM. As always, if I’m asked a question I’ll try to also include the answer in...(read more)![]()
↧
↧
Microsoft CRM Online : Moving Data, Migrating Data, Getting All Setup
It is true that you can import data into Microsoft Dynamics CRM Online.
It is true that you can setup complex integration with Microsoft Dynamics CRM Online.
It is true that you are not the first person to do this nor the first company or complex Enterprise or complex small business environment.
When you need to get started it is; however, helpful to have a service that supports getting you started. Needless to say Microsoft now offers the DATA LOADER SERVICE for CRM Online.
There are two great blog posts on this service written by the team!
Data Loader for Microsoft Dynamics CRM Post 1 of 2
Data Loader for Microsoft Dynamics CRM Post 2 of 2
↧
Why do you not blog: A Challenge
Everyone should have a blog, as I have stated many times in webinars or in conference presentations. Everyone has unique experiences that could probably benefit the community as a whole, should you choose to. How I got started Way back when, in 1995, I had to learn C#, .NET, and SharePoint in about a three-week […]![]()
↧
Tip #558: O Mailbox Statistics, Where Art Thou?
Challenge
Joel can be such a pain, he always keeps asking some questions no one seems to know the answer for. Like the other day:
What are these sync cycle processing records that feed the server side sync performance dashboard? I don’t see them in the system job log. Is there any way to bulk delete them so the server side synchronization performance dashboard is usable and doesn’t exceed the aggregate fetch record limit?

Response
What a poor developer can do but a bit of digging?
From https://msdn.microsoft.com/en-us/library/gg328086.aspx:
Internal entities
The following entities are visible in the system but have no supported developer scenarios.
| Entity type code | Entity logical name | Display name | Ownership type |
| <snip> | |||
| 9607 | mailboxstatistics | Mailbox Statistics | Organization owned |
Confirming that Retrieve does work on that entity, Delete does not, BulkDeleteRequest fails as well with “Privilege Type Delete not defined on entity ‘MailboxStatistics’”
Unless there are some system processes that clean up this table, this table seems to continue to grow.
The road to nowhere
We were told that there are clean up processes in place for this table, however, according to Joel
Every environment in which I have checked that has server side sync for more than 50 users, this dashboard is unusable. It’s a shame, because this could be very helpful if it worked.
I guess that means that we have to wait until more information about this entity becomes available.
↧
17 de Febrero: Microsoft Dynamics CRM 2016 – ¿Qué hay de nuevo?
CRM 2016 ya está aquí con nosotros disponible tanto en CRM Online como On-premises y MUY cargada de novedades por demás interesantes.
Es por ello que los expertos más destacados de habla hispana en Dynamics CRM se vuelven a reunir para compartir las novedades de esta nueva versión. Y ahora, con demos! :).![]()
![]()
↧
↧
CRUD operations using Web API
In this tutorial we will learn how to perform CRUD (create, retrieve, update and delete) operations using Dynamic CRM Web API.
Create
Use a POST request to send data to create an entity. To create...(read more)![]()
↧
Form script for keypress events and auto-completion feature in CRM 2016
The control object provides methods to change the presentation or behavior of a control and identify the corresponding attribute.
We can access controls using the Xrm.Page.ui.controls , Xrm.Page...(read more)![]()
↧
New ways to Update Transaction Data in NAV 2015
The post New ways to Update Transaction Data in NAV 2015 appeared first on Dynamics 101.
In this demo, we are going to have a look at new patterns that Dynamics NAV 2015 provides for updating data during a transaction.
First, we will discuss the design patterns which were previously used to update the data in Dynamics NAV, and have since become outmoded solutions. Then, we will look at the setup update implemented in Dynamics NAV 2015 version. Finally, we will run a report, check how the new update pattern works, and review the functions it performs. We will also point out the limitations of using the pattern.
Dynamics NAV is traditionally designed to pop-up errors for the user if the data is missing or incorrect before posting routine is started. If we look at the posting routine codeunit, we will see that a TESTFIELD function is called for in order to check the data:

If the data is missing, it gives an error to the user:

Thus, the posting process is rolled back and the user should correct the error in order to continue.
The new design pattern is created to allow users to correct the error without stopping the transaction. This pattern is recommended for small companies where the owner of the issue can actually solve it as well.
The Pattern
Instead of using a TESTFIELD function, Dynamics NAV2015 introduced a set of functions that will check that the data is available and if not, open the necessary page for the user to complete the setup. In general, the new pattern performs the following actions:
- Verify the data
- Pop-up a message to the user with the data that is missing. Usually this is a confirmation dialog where the user can click OK to open the required setup page and complete the setup data entry, otherwise if the user clicks Cancel, the process either runs without the setup (if it’s not mandatory) or throws an error again
- Verify the data again (if the user made some setup data update)
Let’s have a look at the example of how this pattern works in Dynamics NAV 2015. In the Role Tailored Client, navigate to a posted sales invoice and click Print button. A message appears informing the user that Company Information setup is not complete and there is missing Payment data:

If the user chooses to click No, another message appears and a report request page is open:


If the user runs a report at this time, he will notice that the company payment information is blank on the header:

However, if the user clicks Yes on the suggestion to update the payment information, the Company Information page opens on the relevant tab.

This allows for quick data entry of the missing information. Let’s enter, for example, the Bank Name and click OK:

Now, if the user runs the report again, he will get no notification, because the minimum required data was entered in the setup:

Let’s have a look inside of this process and the functions involved. In the Object Designer, select Report 206 and click Design. In the OnInitReport() trigger, we can see a new function VerifyAndSetPaymentInfo():

This function is called for before the actual report request page is available to the user. Right-click on the function name and click Go To Definition. The table 79 Company Information function VerifyAndSetPaymentInfo() is open :

This function calls for another function called IsPaymentInfoAvailable() which checks that either of the payment fields contains data and returns a boolean (true/false) :

Next, the system checks that the user has confirmed to edit the missing data and opens the relevant page in RUNMODAL view. Finally, a check for the payment data is performed again, and if it’s still not available, the user will get the message again.
Pattern Limitations
This pattern is not suitable for substituting TESTFIELD function during the posting process. That assumes data modification, because it implies running a page modally, which causes a block in the system. Dynamics NAV prevents developers from doing that.
Summary
In this demo, we had a look at the new design pattern that allow the users to update data without having to re-run the process once again in case of any errors received. This approach can be effective if used properly and will save time on data entry and setup for the users.
↧