A noteworthy idea with a challenging path ahead
So, with the July 2017 update dropping in at the beginning of October (I know, nomenclature issues here), among the new features we get, one items got...(read more)![]()
↧
Dynamics 365 Virtual Entities
↧
Excel Template Gotcha in Microsoft Dynamics 365
I recently needed to create an Excel template for a customer. My scenario:
- The template was to be based on appointments that were ‘Regarding’ a specific record type .
- It needs to group the time spent on each of the appointments based on a value from the regarding record.
- Customer has Microsoft Dynamics CRM 2016 on premise.
Easy…or so I thought…
So, off I went – from an Appointment view I used the Create Excel Template function to add the columns I needed and Downloaded my file. In Excel, I added my column and used an If Statement to create my grouping based on the value from the Regarding record and then used a pivot table to summarise – done!!!!

But that wasn’t quite it – once I uploaded my new template and tested it against another record - it wasn’t working - the data exported no longer had the value from the related record. The column I had added to the template was there but it had no data…Ok so maybe a momentary glitch.. but no… I tried again – this time created a new personal view with the data instead of using Edit Columns function.

But still no luck – the data is there when you Download the File but not when you generate the Template after Uploading it.
Luckily, I was able to get around this limitation with the Excel Templates as the Name of the Regarding Record contained the value I needed to group the appointments by. But instead of a simple ‘If’ statement I now needed to find the value in the middle of the name and set a value.

Done - Finally! This only seems to be a limitation in CRM 2016 but it would be nice if it was resolved.
↧
↧
Dynamics 365: Implementing on-save confirmation dialog with Alert.js
We can make some fields required and we can make other fields optional.. But what about all those not so black-and-white situations where the system may still be able to warn the users about some possible...(read more)![]()
↧
Cloning a Record in Dynamics CRM
Recenly we received requests from clients and some questions from Dynamics Community members on how to Clone records. Although there are some available solutions out there, and the various possibilities on how to implement this, we would like to demonstrate here one possibly and not to complicated way on how to implement this. This implementation involved using Ribbon Workbench to create the Clone button and a Command that will execute a JavaScript function, which will call an action and execute Plugin/Action code to copy the record.
So the first step of course is using Ribbon Workbench to create the button, enable/display rules and the command. We start of by adding our entity that we want to customize to a new Unmanaged solution. We only need to add the entity, and not all of the components of the entity. Once we created the solution we open Ribbon Workbench, and select the new solution that we created.
We can not add a new button with an image to the form command bar, as shown in the picture below:

You should also add the Label, Alt, Tool Tip Text and Tool Tip Description. It is a good habit to have the Tooltip Description display a different text that the Tool Tip Text. We can now create the display rule. We created a simple display rule only with a FormStateRule that has a State of Existing. This means that the Clone Command will only be available for records that already exist in the System, but not for newly or disabled records. You can change the display rule, as you wish.
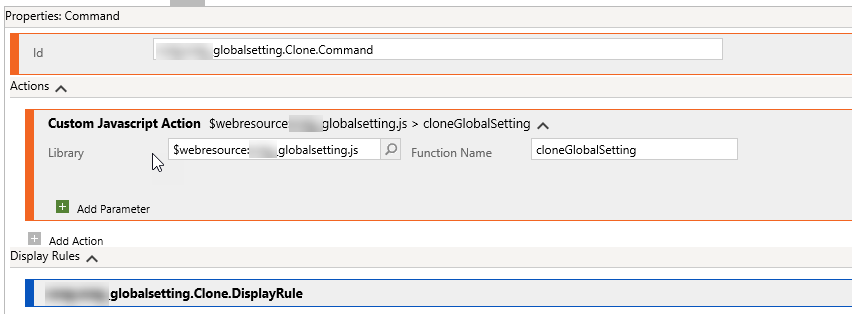
Once we have the display rule, we will create the command. You should have a JavaScript Library in place for your entity that you wish to clone ahead of time, so that you can use it for the Command. You can also use a Global library if you are planning to use the same logic for multiple entities. In the command we will Create a Custom JavaScript action and specify the name of the library and function that will be used when the Clone Command Bar button is clicked (shown is the image below).
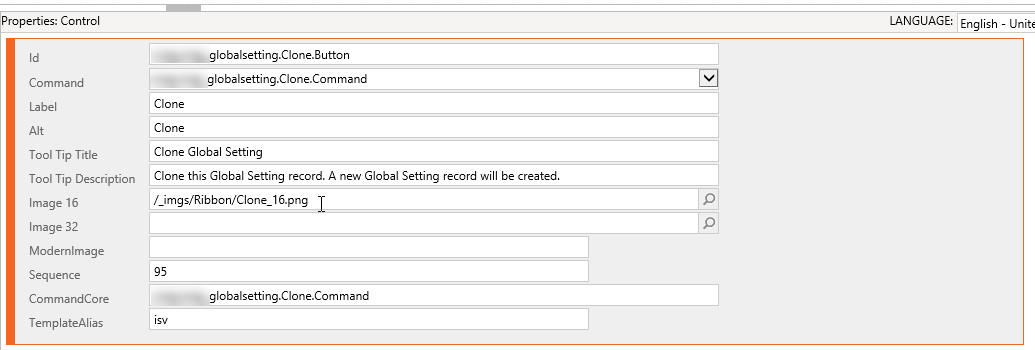
Let's go ahead and look at the finalized button properties before publishing the solution changes.
We can now click on the Publish button in Ribbon Workbench to finish adding the button to our form. The next step is to add the JavaScript code to our library that we previously created. There are a few ways of calling actions from JavaScript, but we prefer to use the process.js JavaScript Library. This library can be downloaded from github, and is available here: https://github.com/PaulNieuwelaar/processjs. Add this library to your form where you added the Clone button to, so that you can use it in your JavaScript Library.
function cloneGlobalSetting()
{var entityId = Xrm.Page.data.entity.getId();var entityName = "new_globalsetting";var messageName = "new_CloneGlobalSetting";var success = callCloneAction(entityId, entityName, messageName);if (success) {
        Xrm.Page.ui.setFormNotification("Record has submitted for cloning.", "INFO", "GEN")
        setTimeout(function () {
            reloadPage(entityId);
        }, 3000);
    }
}
The above function calls the callCloneAction, and passes the Guid of the entity record, the name of the entity and the name of the SDK message that will be created. The below code snippets show the callCloneAction and callProcessAction functions. Although these can be combined into one, we separated them, since we have multiple function calls to Actions in our code, and use the callProcessAction for multiple purposes. If you only have one call to callProcessAction, you can keep it separate, or add it to your global script library to be used across multiple entities.
function callCloneAction(entityId, entityName, messageName, name) {var inputParams =
        [
            {
                key: "Target",
                type: Process.Type.EntityReference,
                value: new Process.EntityReference(entityName, entityId)
            }
        ];var success = callProcessAction(entityId, entityName, messageName, inputParams);return success;
}function callProcessAction(entityId, entityName, messageName, inputParams) {var success = true;
    Process.callAction(messageName, inputParams,function (params) {// Successvar result = "";for (var i = 0; i < params.length; i++) {
            result = params[i].key + "=" + params[i].value + ";";
        }// alert(result);
        success = true;
    },function (e, t) {// Error
        success = false;
        alert(e);if (window.console && console.error)
            console.error(e + "\n" + t);
    }
    );return success;
}
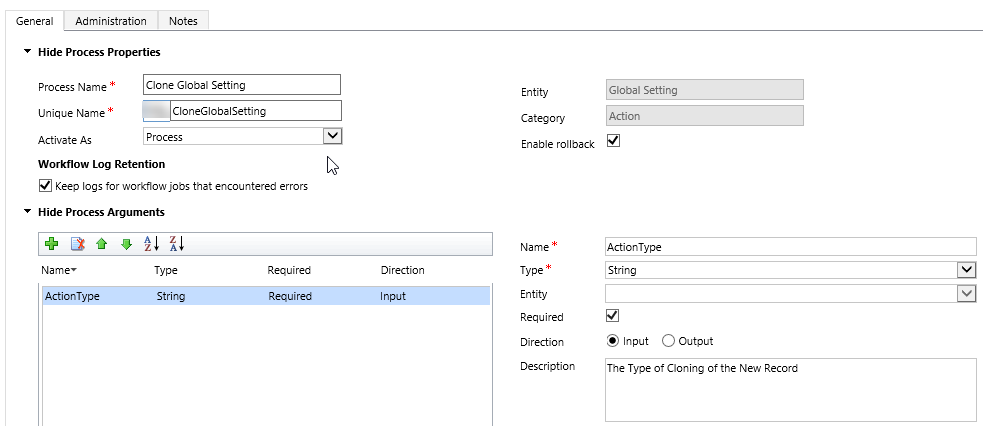
Now that we have added our JavaScript code to our library, we need to upload and publish this file, as well as add it to the form. Once that is done, we need to create the Action Process in our solution. We do this by navigating to Settings -> Processes and Creating a New Action. The screenshot below shows the Action Process that we created. Note that there is a parameter called Action Type, which is not required for this particular case, but is used for our cloning process, since the record can be cloned in a few different ways.
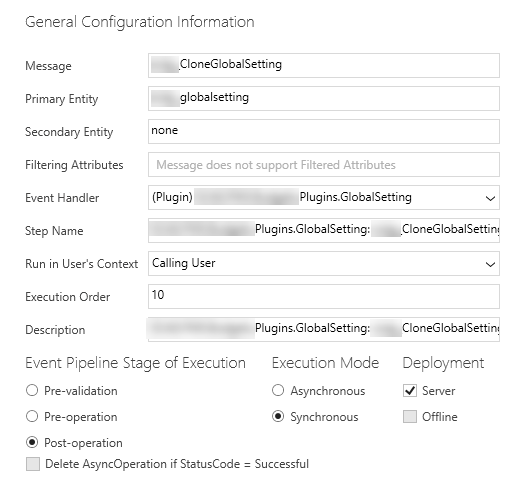
We now have to add the Plugin/Action code and register it. The first thing to do is create a new plugin. If this is the first time you are creating a new plugin, please follow the Microsoft MSDN article on how to create a Basic Plugin here. In our Plugin project, we created two classes, although this can be done with one. The first class shown below is just the entry point which calls the actual class that processes the action.
publicclassGlobalSetting : Plugin
    {public GlobalSetting()
            : base(typeof(GlobalSetting))
        {this.RegisteredEvents.Add(new Tuple<int, string, string, Action<LocalPluginContext>>(40, "new_CloneGlobalSetting", "new_globalsetting", new Action<LocalPluginContext>(ExecutePostGlobalSettingClone)));
        }protectedvoid ExecutePostGlobalSettingClone(LocalPluginContext localContext)
        {if (localContext == null)
            {thrownew ArgumentNullException("localContext");
            }string entityName = localContext.PluginExecutionContext.PrimaryEntityName;
            Guid entityId = localContext.PluginExecutionContext.PrimaryEntityId;string actionType = localContext.PluginExecutionContext.InputParameters["ActionType"].ToString();


            ITracingService tracingService = localContext.TracingService;
            tracingService.Trace("Entered {0} Plugin Method", "ExecutePostGlobalSettingClone");using (GlobalSettingLogic logic = new GlobalSettingLogic(localContext.OrganizationService, localContext.TracingService))
            {
                logic.CloneGlobalSetting(entityName, entityId, actionType);
            }
        }
    }
In our second class (GlobalSettingLogic), which is only a class that hold the logic of the requirement we will add the following function:
private Guid CloneGlobalSetting(Entity globalSetting)
        {
            Entity newGlobalSetting = new Entity(new_GlobalSetting.EntityLogicalName);foreach (KeyValuePair<String, Object> attribute in globalSetting.Attributes)
            {string attributeName = attribute.Key;object attributeValue = attribute.Value;switch (attributeName.ToLower())
                {case"new_globalsettingid":break;case"new_name":
                        newGlobalSetting[attributeName] = attributeValue + " - Cloned";break;default:
                        newGlobalSetting[attributeName] = attributeValue;break;
                }

            }

            try
            {
                Guid globalSettingId = service.Create(newGlobalSetting);return globalSettingId;
            }catch (FaultException<OrganizationServiceFault> ex)
            {thrownew InvalidPluginExecutionException("An error occurred in the CloneGlobalSetting function of the plug-in.", ex);
            }
        }
We now how to Build our Plugin, and deploy it using the Plugin Registration Tool (as shown in the following screenshot). The Action Process must have been completed prior to this step in order for it to appear as a Message in the Plugin Registration Tool.
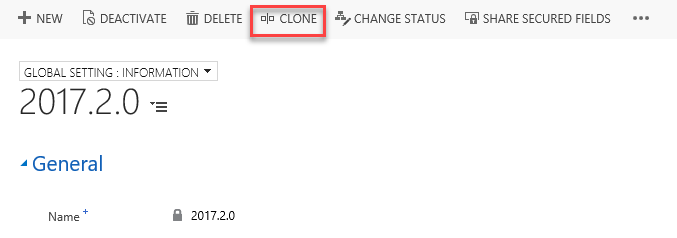
Once the Plugin is registered, you are basically done. You can now test it out, and go to your form, click on the Clone button and a newly Cloned record can be created. The final form will look like this with the Clone button:
↧
Creating a Ribbon Button Using Ribbon Workbench to call a JavaScript action
This blog post will demonstrate how to create a simple button using Ribbon Workbench which will execute a JavaScript function on the client. In order to do this make sure that you have Ribbon Workbench installed in your CRM environment, or you can use the Ribbon Workbench that is available with XRMToolbox. To download Ribbon Workbench, you can go to https://www.develop1.net/public/rwb/ribbonworkbench.aspx.
So the first step of course is using Ribbon Workbench to create the button, enable/display rules and the command. We start of by adding our entity that we want to customize to a new Unmanaged solution. We only need to add the entity, and not all of the components of the entity. Once we created the solution we open Ribbon Workbench, and select the new solution that we created.
We can not add a new button with an image to the form command bar, as shown in the picture below:
You should also add the Label, Alt, Tool Tip Text and Tool Tip Description. It is a good habit to have the Tooltip Description display a different text that the Tool Tip Text. We can now create the display rule. We created a simple display rule only with a FormStateRule that has a State of Existing. This means that the Clone Command will only be available for records that already exist in the System, but not for newly or disabled records. You can change the display rule, as you wish.
Once we have the display rule, we will create the command. You should have a JavaScript Library in place for your entity that you wish to clone ahead of time, so that you can use it for the Command. You can also use a Global library if you are planning to use the same logic for multiple entities. In the command we will Create a Custom JavaScript action and specify the name of the library and function that will be used when the Clone Command Bar button is clicked (shown is the image below).
Let's go ahead and look at the finalized button properties before publishing the solution changes.
We can now click on the Publish button in Ribbon Workbench to finish adding the button to our form. The final step is to add the JavaScript code to our library that we previously created.
function cloneGlobalSetting()
{
   Xrm.Page.ui.setFormNotification("I clicked on a new button!!!", "INFO", "GEN")
}
↧
↧
WebAPI Library Comparison in Dynamics 365
When choosing to execute webapi functions, that are various methods that are available. The first option of course is to use the default GET, POST and PATCH required to Retrieve and Update data in CRM using the Web API. The following shows how to call the WhoAmI WebApi function.
function WhoAmIRequest() {var clientUrl = Xrm.Page.context.getClientUrl();var req = new XMLHttpRequest()
    req.open("GET", encodeURI(clientUrl + "/api/data/v8.2/WhoAmI()"), true);
    req.setRequestHeader("Accept", "application/json");
    req.setRequestHeader("Content-Type", "application/json; charset=utf-8");
    req.setRequestHeader("OData-MaxVersion", "4.0");
    req.setRequestHeader("OData-Version", "4.0");
    req.onreadystatechange = function () {if (this.readyState == 4 /* complete */) {
            req.onreadystatechange = null;if (this.status == 200) {var data = JSON.parse(this.response);var userId = data.UserId;
            }else {var error = JSON.parse(this.response).error;
                showUserError(error.message);
            }
        }
    };
    req.send();
}
The first library is using the Web API library by ZA CRM Guy. The library is available for download from codeplex here. To call the library you add a reference to the library to your form where you want to call it from. The following sample shows how to call the webapi retrieve method:
function RetrieveAccount(accountId)
{var accountId = '7877837E-1BCC-E511-80E4-FC15B428AA54';var queryFields = "name,accountnumber";
    SDK.WEBAPI.retrieveRecord(accountId, "accounts", query, "",function (result) {var accountNumber = result.AccountNumber;
        },function () {// Enter code for error here
        });
}
This library is the simplest of all, and contains the basic functions for Create, Update, Retrieve, Retrieve Multiple and Delete. It is easy to use, but lacks a lot of the functionality of Web API. If you only need the basic function calls, it is a good option.
The second option is the Dynamics Web Api library by AlexandrRogov, which is available for download on GitHub here. This library is extensive and contains samples on how to use the webapi functions from Web Resource JavaScript functions as well as Node.js.
The library contains configuration parameters, so that it allows for impersonation, specifying the api version, paging size and more. This DynamicsWebApi library supports both Basic and Advanced calls to the web api. The available Basic calls include: create, update, upsert, deleteRecord, retrieve, retrieveMultiple, retrieveAll, count, countAll, executeFetchXml, executeFetchXmlAll, associate, disassociate, associateSingleValued, disassociateSingleValued, executeBoundFunction, executeUnboundFunction, executeBoundAction, executeUnboundAction. This allows for a comprehesive retrieval of most CRM data.
The library also includes Formatted Values and Lookup Properties to retrieve the related attribute information for Option Sets and Lookup Controls. The following sample shows how to call the WhoAmI request:
function WhoAmIRequest()
{var dynamicsWebApi = new DynamicsWebApi();
    dynamicsWebApi.executeUnboundFunction("WhoAmI").then(function (response)
    {var userId = response.UserId;
    }).catch(function (error)
    {
        console.log(error.message);
    });
}
The final library that I will be showing is the Xrm.Tools.CRMWebApi library by David Yack, and also is available on GitHub here. This is also a comprehensive and lightweight library, with usage samples in JavaScript, DotNet, Node.JS, PHP and Python. The following sample shows how to use the WhoAmI required as well as get data from from the SystemUsers entity. You will notice the simplicity of creating the function calls and adding properties to functions to retrieve related data.
function RetrieveUsers()
{var apiconfig = { APIUrl: Xrm.Page.context.getClientUrl() + '/api/data/v8.2/' };var crmAPI = new CRMWebAPI(apiconfig);var userid = null;
    crmAPI.ExecuteFunction("WhoAmI").then(function (result) {
        userId = result.UserId;
    }var queryOptionsUser = {
        FormattedValues:true,
        Expand:[{ Property: 'businessunitid', Select: ['businessunitid', 'name', 'websiteurl'] }]
    };

    crmAPI.Get("systemusers", userId, queryOptionsUser).then(function (buresult)
    {
        PopulateOutputData(buresult);
    });
}
Finally, with the release of Microsoft Dynamics 365 version 9.0, the Xrm.WebApi class was added to the Xrm namespace. This class is comprehensive, and I would say that for the first release, contains most of the functionality that most users would need, and we know that this library will evolve as the versions of Dynamics 365 continue to progress. The sample below uses the basic WhoAmI request, that we showed in the previous samples.
function WhoAmIRequest()
{
    Xrm.WebApi.execute(whoAmIRequest)
        .then(function (result) {var response = JSON.parse(result.responseText);var userId = response.UserId;
        })
        .fail(function (error) {var message = error.message;
        });
}
Our conclusion is simple. If you need just basic functionality, and will never go past that, then SDKWebApi library might be sufficient. For anything more than that, we would recommend to use either the DynamicsWebApi by Aleksandr Rogov or the CRMWebApi tool by David Yack. Both are great tools and very extensive libraries.
If you are already on Dynamics 365 version 9 (July 2017 Update), we would recommend to start getting yourself familiarized with the Microsoft version of the library. It is extensive, yet simple and it will evolve as the product evolves.
↧
Retrieving data fields from subgrid
This is probably a request that has been required many times, but recently, one of our customers had a request to open an OnBase document based on some data that was available in a subgrid. Since OnBase has a web to query the database using a query string in their web application, this seemed to be an easy enough solution.
The first step was to create a button on the ribbon that will call a JavaScript function that will in turn execute the OnBase function call. To do this we created a button on the Command Bar of the entity using Ribbon Workbench. You can view our previous published post on how to create a button using Ribbon Workbench if you need further assistance with this process.
In this case we created a button called OnBase, which calls the showOnBase function and passes the CommandProperties. The reason that it is passing the CommandProperties, is that the button has various options for that same form. The image below shows the button that was created using Ribbon Workbench. This is a flyout button, thus has various different options.

Next we need to enter the JavaScript for the flyout button. In our case we used a single function for the flyout and passed the CommandProperties, in order to get the name of the button that was clicked. The following Script shows how to find out which button was clicked, and based on that we will be calling our process.
function showOnBase(CommandProperties)
{var controlId = CommandProperties.SourceControlId;var menuItemId = controlId.split('|')[3];var recordType = menuItemId.split('.')[2];switch (recordType)
    {case"OnBaseContract":
            showOnBaseContract();break;case"OnBasePurchaseOrder":
            showOnBasePurchaseOrder();break;case"OnBaseInvoice":
            showOnBaseInvoice();break;default:break;
    }
}
In our particular case, we are interested in getting the value for a subgrid, which means that the user would have to select the record from a subgrid and the click on the appropriate button. The image below shows our Purchase Order subgrid. When the user selects the PO subgrid row, and the clicks on the Command Bar Purchase Order command, we will open up the Purchase Order using OnBase. The image below displays the PO subgrid.

We can not get the purchase order number from the selected record and Open OnBase.
function showOnBasePurchaseOrder()
{var selectedRows = Xrm.Page.getControl("PurchaseOrders").getGrid().getSelectedRows();var selectedRow = selectedRows.getAll()[0];var attributes = selectedRow.getData().getEntity().getAttributes().getAll();// scag_ponumber
    attributes.forEach(function (attribute) {var attributeName = attribute.getKey();if (attributeName == "new_ponumber")
        {var poNumber = attribute.getValue();var url = "http://ecmweb/AppNet/docpop/docpop.aspx?KT123_0_0_0=" + poNumber + "&clienttype=activex&cqid=111";
            openOnBase(url);
        }
    });
}function openOnBase(url)
{
    window.open(url);
}
You can use different methods to open your OnBase form if you don't want to use the window.open, but this was a good option for the purpose that we needed.
↧
Six Techniques to Elicit Requirements Effectively
Eliciting Requirements
I recently watched a webinar from the IIBA (International Institute of Business Analysis) called Elicitation without Alienation. The webinar was presented by Francine Wolfe, Sr. Business Analysis Consultant. The topic was chosen as BA’s (business analysts) are often perceived negatively - they are nosy or annoying! They are always questioning everything!! But we are supposed to be inquisitive so the webinar was about how to avoid this perception.
Francine talked about the following areas:
- Know your audience - As BA’s we need to watch, listen and learn and make sure we are aware of the verbal and non- verbal cues. For me, sometimes I find am so busy trying to take notes that I don’t always pay enough attention to what’s going on around me - In future I’ll consider different approaches such as recording sessions so I can ensure I’m always engaged.

- Regard ALL Business Stakeholders as Subject Matter Experts as they all have something you need whether it is a better understanding of the high-level scope of the project or details on a daily process.
- Regard ALL Technical Stakeholders as Technical Experts as you need them to help with technical explanations and potential alternatives to meet the intent of the requirements.
- Know your own elicitation strengths and weaknesses - this topic resonated with me as one of the points raised was to be especially careful if you have subject matter expertise. I found myself in a situation like this a while ago and had to keep reminding myself that although I used to know the process I didn’t know it now as I was no longer doing that job.
- Be prepared - have an agenda, get to know what you can about the subject and stick to time limits. One of the other points raised during this area was Visual, such as diagrams, are helpful. I have used this technique in the past – my diagram may have been completely wrong but it gave everyone a starting point in the discussion.
- Earn your credibility - this is not a given based on role title; credibility is something you need to earn over and over again. As a BA for a vendor I am usually dealing with a new project so this is something I face with every new customer.

My biggest take away from the webinar was one of Francine’s Final Thoughts - Make it Fun for you and the people involved. This doesn’t mean clowns and balloons but make it comfortable, make it enjoyable – these people are taking time out of what is probably a busy day to discuss something that is probably going to change their jobs. So, do your best to make it a painless as possible.
↧
Resolving GUID SSIS Import Error “The value could not be converted because of a potential loss of data”
Perhaps one of the most fiendish aspects of working with SQL Server Integration Services (SSIS) is the inevitable data transformation/conversion issues that get thrown up, even as part of relatively simplistic...(read more)![]()
↧
↧
Known Issues in V9
I’m not sure I’ve ever seen this kind of comprehensive “known issues” page for the earlier releases of Dynamics 365/CRM, but it’s definitely worth looking at just so you are...(read more)![]()
↧
Plug-in related topics
A plugin is a physical dll and it contains a .Net class. To create a plugin, we register a step (Configuration which identifies what action will take place). After registering the step we select an image...(read more)![]()
↧
Useful Dynamics CRM 2016 Web API Queries: Part 2
Web API is an easy way to send queries to CRM with Javascript. Since the XMLHttpRequest and JSON libraries are available with Javascript we can use these libraries to send a HTTP request to the Web API and parse the JSON response data to objects.
Here are some more queries which I found useful.
Updating Lookup field
When updating a lookup field on a record in Dynamics CRM 2016 using the name of the field the following error will be presented.

| PATCH | http://testserver/testorg/api/data/v8.0/mag_resolutions(639ea864-a071-e711-80d6-00155d048d70) |
| Request | { "mag_resolutionnumber": "5264", "mag_issueid@odata.bind" : "/mag_issues(93f66077-a071-e711-80d6-00155d048d70)" } |
| Response | { "error":{ "code":"","message":"An undeclared property 'mag_issueid' which only has property annotations in the payload but no property value was found in the payload. In OData, only declared navigation properties and declared named streams can be represented a ………… } |
Using the Schema Name of the lookup field resolves the issue (i.e. it is case sensitive). For other field types in Dynamics CRM 2016, you must use the field name. Best practice is to create fields with lower case names so the Name and Schema Name will both be lower case therefore updating a lookup field will be the same as updating other field type fields using lower case name of the field.

| PATCH | http://testserver/testorg/api/data/v8.0/mag_resolutions(639ea864-a071-e711-80d6-00155d048d70) |
| Request | { "mag_resolutionnumber": "5264", "mag_issueid@odata.bind" : "/mag_issues(93f66077-a071-e711-80d6-00155d048d70)" } |
Querying a record by Lookup Id
When querying Dynamics CRM 2016 records filtering against a lookup field using the name or schema name of the field the following error will be presented.

| GET | http://testserver/testorg/api/data/v8.0/mag_resolutions?$select=mag_name,mag_IssueId&$filter=mag_IssueId eq 93f66077-a071-e711-80d6-00155d048d70 |
| { "error":{ "code":"","message":"The navigation properties are not supported with $select clause","innererror":{ "message":"The navigation properties are not supported with $select clause","type":"Microsoft.Crm.CrmHttpException","stacktrace":" at ………… } |
Adding the underscore character (_) followed by the name of the lookup and ending with ‘_value’ results in a successful query.
| GET | http://testserver/testorg/api/data/v8.0/mag_resolutions?$select=mag_name,_mag_issueid_value&$filter=_mag_issueid_value eq 93f66077-a071-e711-80d6-00155d048d70 |
| { "@odata.context":"http://testserver/testorg/api/data/v8.0 /$metadata#mag_resolutions(mag_name,_mag_issueid_value)","value":[ { "@odata.etag":"W/\"1255350408\"","mag_name":"Resolution 1","_mag_issueid_value":"93f66077-a071-e711-80d6-00155d048d70","mag_resolutionid":"639ea864-a071-e711-80d6-00155d048d70" } ] } |
Executing a Fetch XML Query
Instead of using OData queries you can also use the familiar Fetch XML queries. But to use Fetch XML the query would need to be URL encoded.
| Fetch | <fetch version="1.0" output-format="xml-platform" mapping="logical" distinct="true"> <entity name="mag_resolution"> <attribute name="mag_name" /> <filter type="and"> <condition attribute="mag_name" operator="eq" value="Resolution 1" /> </filter> </entity> < /fetch> |
| URL Encoded | %3Cfetch%20version%3D%221.0%22%20output-format%3D%22xml-platform%22%20mapping%3D%22logical%22%20distinct%3D%22true%22%3E%0A%20%20%3Centity%20name%3D%22mag_resolution%22%3E%0A%20%20%20%20%3Cattribute%20name%3D%22mag_name%22%20%2F%3E%0A%20%20%20%20%20%20%3Cfilter%20type%3D%22and%22%3E%0A%20%20%20%20%20%20%20%20%3Ccondition%20attribute%3D%22mag_name%22%20operator%3D%22eq%22%20value%3D%22Resolution%201%22%20%2F%3E%0A%20%20%20%20%20%20%3C%2Ffilter%3E%0A%20%20%3C%2Fentity%3E%0A%3C%2Ffetch%3E |
The query will contain ‘fetchXML=’ followed by the URL encoded fetch query.
↧
Mobile Offline Functionality on a Tablet
Dynamics 365 Mobile offline has some of the features that the web and mobile online client offer, but these are limited. The features available on the web client that are not available on the mobile client online include:
- Quick View
- Ad-hoc email generation
Further restrictions apply to the mobile client offline, and these include:
- Relevance Search
- Charts on Dashboards
In this blog, we’ll explore what features are not available on the mobile while offline.
Searching for records
The key difference between online and offline mode is availability of Relevance Search. Relevance Search requires users to be online using the Azure web services to return relevant search results when called upon. As Relevance Search requires a consistent internet connection, this feature is not something that will go offline.

Alternatively, Categorized Search can be used offline allowing the user to search across multiple entities – but this search is limited to one entity at a time. It is also worth noting date fields do not work well offline hence it is recommended these are removed from ‘Find Columns’ in the systems quick view configuration.
Charts
Charts are used on system and personal dashboards but while the user is offline, they will be greeted by an offline message. Users who are primarily working offline should consider using lists or have an alternative dashboard for offline mode that they can switch to.

Knowledge Base Articles
Knowledge Based articles primarily used within the Cases area will not go-offline as of yet. The ability to configure KB articles is not yet available from the system solution area within an entity. Users will be presented with an offline message within the KB article section.

Voice Recognition (IPAD)
Voice Recognition can be used to populate text fields by speaking in to the tablet microphone. Although this is a very useful feature, it is not yet available on tablet devices while the tablet is offline.

Workflows including Rollup Fields
Workflows require an Asynchronous Service to run the triggered job, which currently is only available while the user is connected to the Dynamics 365 server. As a result, all changes that occur offline will trigger all relevant workflows once the changes have synchronised back to the online database.
Rollup fields will calculate once the user is back online as similar to the above, this feature requires the online service to start to roll up the relevant data.
Auditing
Auditing of fields within the configured entities will occur but only when the user goes back online. As there are no offline auditing tables to record the change when it happens, the actual date/time stamp will display the time the user goes back online as opposed to when the actual change occurred.
Document Storage via SharePoint
Documents that are uploaded to the SharePoint library will only be accessible once the user goes back online. Currently, there is no offline storage to take documents offline on the various mobile devices.
Assigning Records
The ability to assign records while offline is temporarily disabled until the full list of users/teams is made accessible when back online.

With Assign

Without Assign
SLAs
The engine that powers the ‘Service Level Agreement’ functionality is only available online, and like workflows, once the tablet goes online the system will work out the correct SLA duration by looking at the ‘Created On’ date and working out the remaining time left before a warning or failure occurs.
Auto Number
All entities that are configured to use the out the box Auto Number functionality will have to wait for the mobile device to go back online before the number can be generated.
Hopefully this helps you navigate what features are and are not available on the mobile version of Dynamics 365 while offline so you can plan accordingly! If you’re looking for tips about Dynamics 365 be sure to check out our blog.
Happy Dynamics 365’ing!
↧
↧
A validation error occurred. The value of ‘membercount’ on record of type ‘list’ is outside the valid range exception in Dynamics 365 (CRM)
We were getting the below error while trying to delete one of the marketing list members from a static marketing list.
This occurs if the Members Count field has value 0 in it, even if there are members...(read more)![]()
↧
Members Count field not getting updated on converting Dynamic Marketing List to Static Marketing List – issue in Dynamics 365 July 2017 Update
While trying out few things in July 2017 update of Dynamics 365, we encountered a strange issue.
The members count field was properly in case of Static Marketing List, however, while converting the Dynamic...(read more)![]()
↧
Dynamics 365 Virtual Entities unsupported field types
Microsoft recently introduced virtual entities into Dynamics 365. This is an easy way (or is it?) to integrate with external system, removing the need for data duplication while having a data model definition...(read more)![]()
↧
Microsoft Dynamics Webcasts, October 23-27, 2017: D365 doc management; AWS for ISVs; Sales Navigator lead gen; Migrating AX, NAV, GP, SL to cloud
Here's what's happening on this week's live webcast schedule. Register to attend live or get access to the recorded event.
Tuesday, October 24, 2017
Solve Document Challenges and Improve Customer Engagement with Xpertdoc and Dynamics 365! 12:00 PM EDT Register

Are you a Dynamics 365/CRM user looking to solve your business' document challenges? Join Xpertdoc Channel Manager
↧
↧
The state of mobility with Microsoft Dynamics 365/CRM: Is your organization up to speed?
Virtually every company has at least some segment of their staff working outside of the office, from an insurance company to an auto parts manufacturer. That's where the requirement for mobility comes in. But what are the key mobile areas for companies actively using Microsoft Dynamics 365/CRM? If your organization is planning for ways to take the next step toward digital transformation, then consider the broad range of today's mobile tools and technologies that stand at the ready to move your business forward.
Just like hardware has come a long way since the early days of the first smartphones and tablets, employee and customer expectations of access to CRM data on the go have also grown rapidly. Let's look at typical mobile application areas where we see Dynamics...
↧
System Views vs My Views – Part One of Two
Which are better? Which should I use for my organization?
There is no definitive answer to either of these questions as the answer is based on each unique organization. To answer this question for you, I would have to ask you some questions as well. How many system views do you currently have setup for your entities? How many of these views do all of your users use? We'll talk about your answers shortly.
What is the difference?
Let's start with some definitions.
System Views are views that are available to any user who can access the entity. They are managed by system administrators or system customizers. The only way to block specific users from seeing system views is by removing their access to the entire entity.
Just because a user can see and select a System View from the list does not mean that they can see all of the records in that view. They can only see records within views that they have access to see. This is true of both System Views and My Views. For example, if you have business unit security setup and it is based on Territories or Regions, a user who can only see accounts within certain states will only see those records when they select a view showing All Active Accounts. Whereas a system administrator in the Parent business unit, who has the highest level of security, can see all records across all Territories/Regions when accessing the same view.
My Views are views that a user has saved through an Advanced Find. They are personal views that only the owner of the view can see, unless they share it with other users and/or teams. The system administrator can manage the users' access level to My Views by updating the Saved View entity in security roles.
You can easily copy a System View to view under My Views but you cannot copy a view under My Views to a System View. You will not see the heading My Views in the view list until you save an Advanced Find.
Which is best for you?
There is no one-size-fits-all answer. If your organization has a long list of System Views and your users are not using all of the views but rather are using a subset depending on their role, then as a System Administrator, you might want to consider using My Views and sharing them with teams. How to do this will be covered in Part Two.
You may want to evaluate your System Views as well. Are you setting up new views with the same columns but with different filter criteria for each Territory/State or for each Service your company offers? In this case, you can setup one view and simply provide training to your users on how to use filtering or use the new grouping feature in D365.
Even if you decide to use My Views and share with Teams, you'll still want to assess your current list of views to determine where you can consolidate prior to making any changes.
What can I Do Now? Where Do I Start?
A best practice for any Views is to use Filter Criteria to its fullest capabilities. Anytime you can use dynamic values instead of hard-coding a value, do it! Here are a few examples:
- My Active Contacts (filter owner = current user)
- My Territory's Accounts (filter related Territory owner = current user)
- Sales Orders Closed Last Month (filter closed date in last month)
- My Team's Recently Updated Opportunities (filter owner's manager = current user and modified date in last X days)
One last note about My Views. When a user creates a view by saving an Advanced Find, only they can see the view, unless they share it. We will go in-depth on how to share views in Part Two, however it's worth mentioning now that if your users are saving their Advanced Finds and not sharing them, only they have visibility. Even a System Administrator cannot see their personal saved views until they are shared. This can cause issues because once a user is disabled, their saved views where they are the Owner, are disabled as well. We can help with this! There is a plug-in that we can register in your organization that will automatically share any user created views with your system administrator account. This will allow for better management of user created views (My Views) throughout your organization. Contact us today to set this up for you! Stay tuned for Part Two: Sharing "My Views" with Teams.
Beringer Technology Group, a leading Microsoft Gold Certified Partner specializing in Microsoft Dynamics 365 and CRM for Distribution. We also provide expert Managed IT Services, Backup and Disaster Recovery, Cloud Based Computing and Unified Communication Systems.
The post System Views vs My Views – Part One of Two appeared first on CRM Software Blog | Dynamics 365.
↧
{Know-how}D365 Customer Engagement- Sub-grid create new record or lookup to existing
In a sub-grid on click of "+" sign, manage create of new record or lookup to existing one. This is applicable to 1:N/N:1 relationship. Ex: Entity1 is related to Entity2 in 1:N fashion. Entity1...(read more)![]()
↧